Contents
What is pericardiocentesis
Pericardiocentesis is a procedure that uses a needle to remove fluid from the pericardial sac that surrounds your heart. Pericardiocentesis may be done to remove and examine fluid that is pressing on your heart. Pericardiocentesis is most often done to find the cause of a chronic or recurrent pericardial effusion. Pericardiocentesis may also be done to treat cardiac tamponade, which is a life-threatening condition.
Normal pericardium is a double-walled sac that contains the heart and the roots of the great vessels. The pericardium is composed of two different layers; an outer fibrous parietal pericardium and an inner visceral pericardium 1. The inner visceral pericardium is a serous-type membrane and is located immediately outside of the myocardium 2. The pericardium prevents sudden dilatation of the heart, especially the right chamber, and displacement of the heart and great vessels, minimizes friction between the heart and surrounding structures, and prevents the spread of infection or cancer from the lung or pleura. The pericardium also contributes to diastolic coupling between the two ventricles 3. In between the parietal and visceral pericardium, there is a pericardial cavity filled with 10-50 mL of fluid, an ultrafiltrate of plasma that is produced by the visceral pericardium. Pericardial fluid acts as a lubricant between the heart and the pericardium. Excess fluid or blood accumulation in this cavity is called pericardial effusion 4.
Sometimes too much fluid builds up in the sac. This is called pericardial effusion. Extra fluid can be caused by many things, including pericarditis (inflammation of the sac), heart attack, surgery, kidney failure, infection, some cancers, and certain diseases such as lupus. Sometimes the cause is not known.
Pericardiocentesis is sometimes done in an emergency. If a lot of fluid builds up too fast, it can cause increased pressure on your heart. This pressure is called cardiac tamponade. It can reduce the heart’s ability to pump blood.
Pericardiocentesis procedure
Pericardiocentesis procedure is most often done in a special procedure room, such as a cardiac catheterization laboratory. It may also be done at a patient’s hospital bedside. A health care provider will put an IV into your arm in case fluids or medicines need to be given through a vein. For example, you may be given medicines if your heartbeat slows or your blood pressure drops during the procedure. You may get a mild sedative to help you relax.
Your doctor will clean an area just below or next to the breastbone or below the left nipple. Numbing medicine (anesthetic) will be applied to the area.
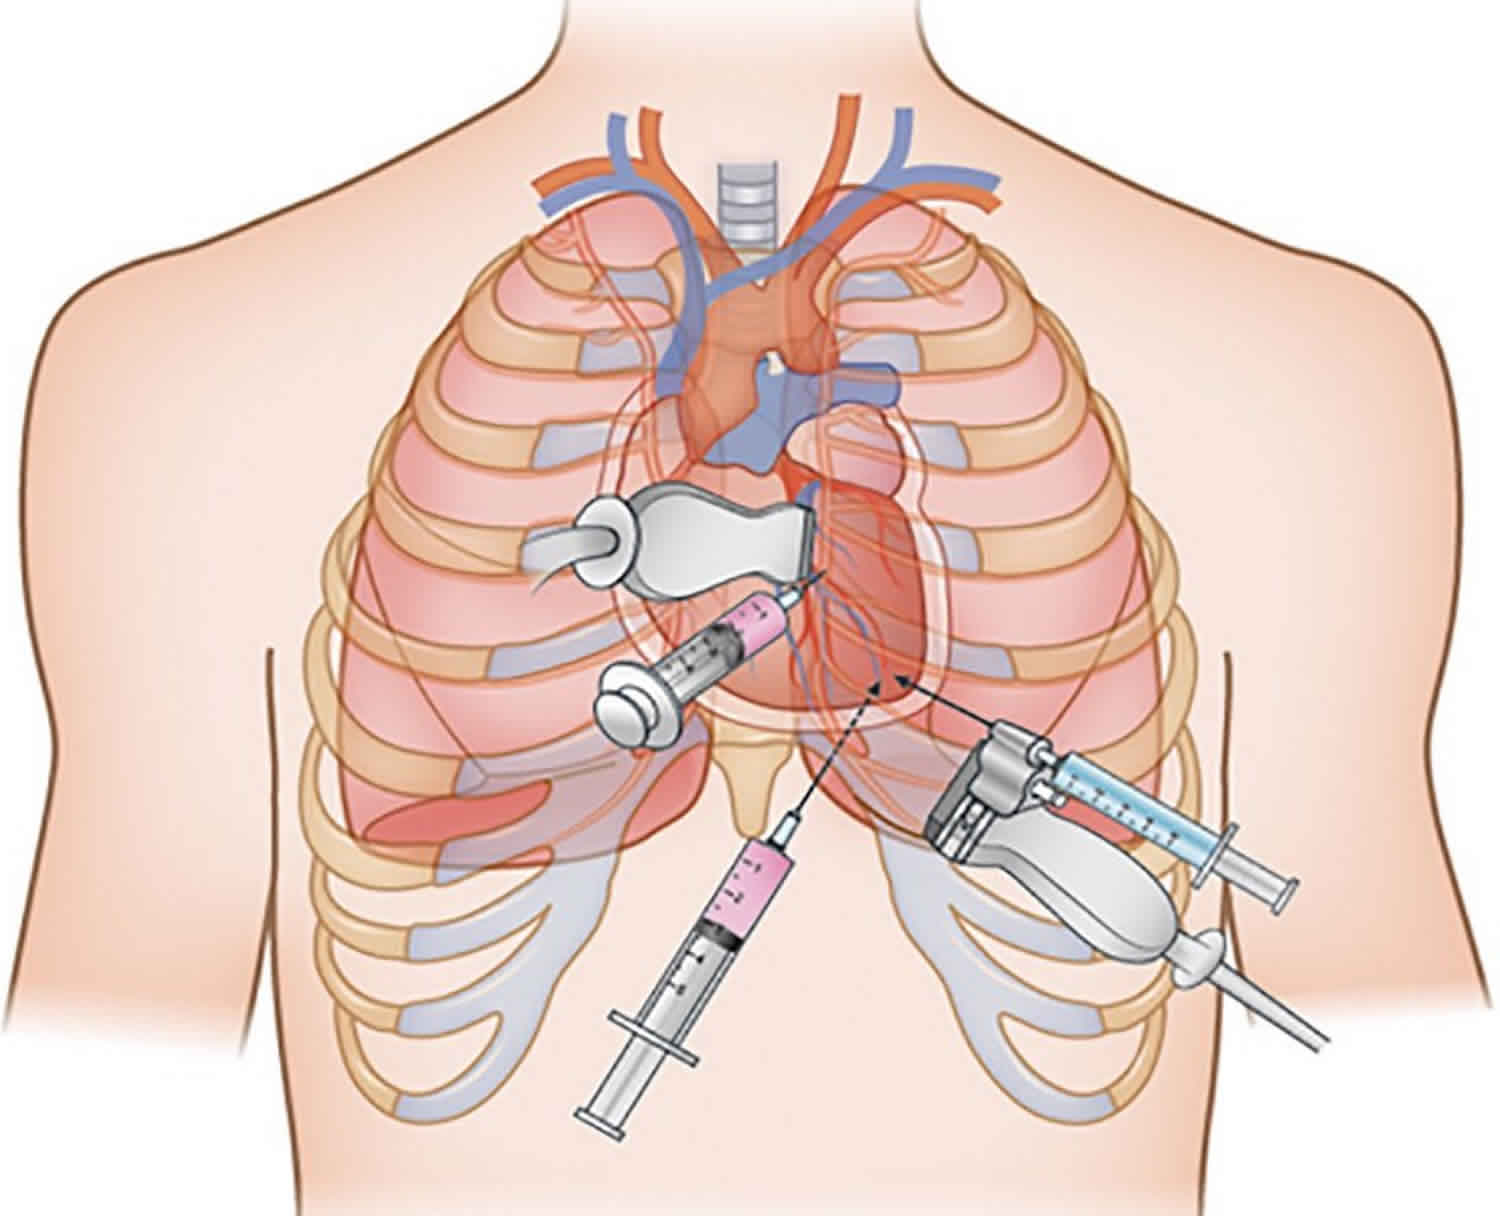
Your doctor will then insert a needle and guide it into tissue that surrounds the heart. Often, echocardiography (ultrasound) is used to help the doctor see the needle and any fluid drainage. An electrocardiogram (ECG) and x-rays (fluoroscopy) may also be used to help with positioning.
There are 3 approaches to needle entry during pericardiocentesis 5:
- left parasternal,
- subxyphoid, and
- left apical.
Among these, the left parasternal approach seems to be preferred in the era of echocardiography-guided pericardiocentesis, because the left parasternal view provides a more direct route to the largest echo free space and better safety than other approaches 6. Using the left parasternal approach, the puncture needle is inserted close to the sternum, usually in the left 5th or 6th intercostal space. This approach is associated with possibly a higher risk of pneumothorax than with the subxyphoid approach 7. The puncture needle during the subxyphoid approach is inserted at an angle between the xiphisternum and left costal margin, towards the left shoulder at a 15 to 30 degree angle to the skin 8. This approach has been performed when echocardiography is not available, in the cardiac catheterization room with ECG monitoring, or in emergent situations. This route is extrapleural and avoids the coronary, pericardial, and internal mammary arteries. Injuries to the pleura, liver, or stomach, irritation to the diaphragm and phrenic nerve resulting in bradycardia and shock, and higher procedure-related mortality have been reported with this approach than with others 9.
In the left apical approach, the puncture needle is inserted into the intercostal space outside of the left nipple, where the left ventricular apical beating is touched, and is toward the right shoulder. During this approach, the apex can easily be pierced, and evoke ventricular fibrillation; thus, it is not indicated in emergent situations and must be performed under the guidance of echocardiography 7. The choice of direction of approach must be decided by an experienced clinician, after considering if there is a safe enough margin of echo free space, the patient’s position, and clinical situation. A major complication of percutaneous pericardiocentesis includes laceration of the heart and coronary arteries, hemothorax and pneumothorax, ventricular tachyarrhythmia, and vasovagal response 9. During pericardiocentesis, clinicians must be attentive to the important anatomic structures in the way of the puncture needle approach, including the internal thoracic arteries (located 0.5 to 2 cm lateral to the sternal edge), intercostal vessels (inferior border of the rib) and nerves, phrenic nerve in the diaphragm, pleura, lung parenchyma, and free wall of the right or left ventricle 7. Aortic dissection is a major contraindication of pericardiocentesis. Relative contraindications include uncorrected coagulopathy, anticoagulant therapy, and thrombocytopenia <50000/mm³, and small, posterior, and loculated effusions 9. Surgical drainage, rather than percutaneous pericardiocentesis is preferred in the following situations: traumatic hemopericardium, purulent pericarditis, recurrent malignant effusion, loculated effusion in the posterior side of the heart, a need for pericardial biopsy with drainage for diagnosis, and coagulopathy or thrombocytopenia 10.
Once the needle has reached the correct area, it is removed and replaced with a tube called a catheter. Fluid drains through this tube into containers. Most of the time, the pericardial catheter is left in place so draining may continue for several hours. Some fluid may be saved and sent to a lab for tests. At different times during the procedure, you may be asked to hold your breath. You must remain very still throughout the procedure.
During the pericardiocentesis procedure, you might feel pain in another area, such as your shoulder. You may also have some irregular or “skipped” heartbeats.
Pericardiocentesis procedure takes 10 to 20 minutes. In some cases, the doctor will let the fluid drain through the tube for a few hours.
Surgical drainage may be needed if the problem is hard to correct or comes back. This is a more invasive procedure in which the pericardium is drained into the chest (pleural) cavity. Alternatively, the fluid may be drained into the peritoneal cavity, but this is less common. This procedure may need to be done under general anesthesia.
Pericardiocentesis technique
Echocardiography guided pericardiocentesis
Percutaneous needle pericardiocentesis has been the most useful therapeutic procedure for the early management of large, symptomatic pericardial effusion or cardiac tamponade, and it continues to be used as a diagnostic procedure in some patients with asymptomatic pericardial effusion, such as chronic idiopathic effusion 11. Before, during, and after the percutaneous pericardiocentesis, transthoracic echocardiography guidance is essential 12. If the pericardiocentesis is performed at bedside without echocardiographic guidance, the risk of threatening complications like bleeding or shock have been reported to be as high as 20%. In contrast, echocardiographic guidance increases the success rate of pericardiocentesis by reducing these complications 13. In Korea, the success rate of echocardiography-guided pericardiocentesis was about 99% 14.
When deciding to perform pericardiocentesis, many clinical and echocardiographic factors must be comprehensively considered. These factors include the amount and location of the effusion, hemodynamics on echocardiography, sufficient margins of the echo free space so as to prevent laceration, clinical indication and urgency, underlying etiologies, and bleeding tendency. Recently, Halpern et al. 15 suggested a “pericardial effusion scoring index” for deciding whether to perform pericardiocentesis. The scoring index consists of 3 components obtained at initial presentation; effusion size on echo, echocardiographic assessment of hemodynamics, and cause of effusion. Authors reported that percutaneous pericardiocentesis could be performed when the score was 4 or above.
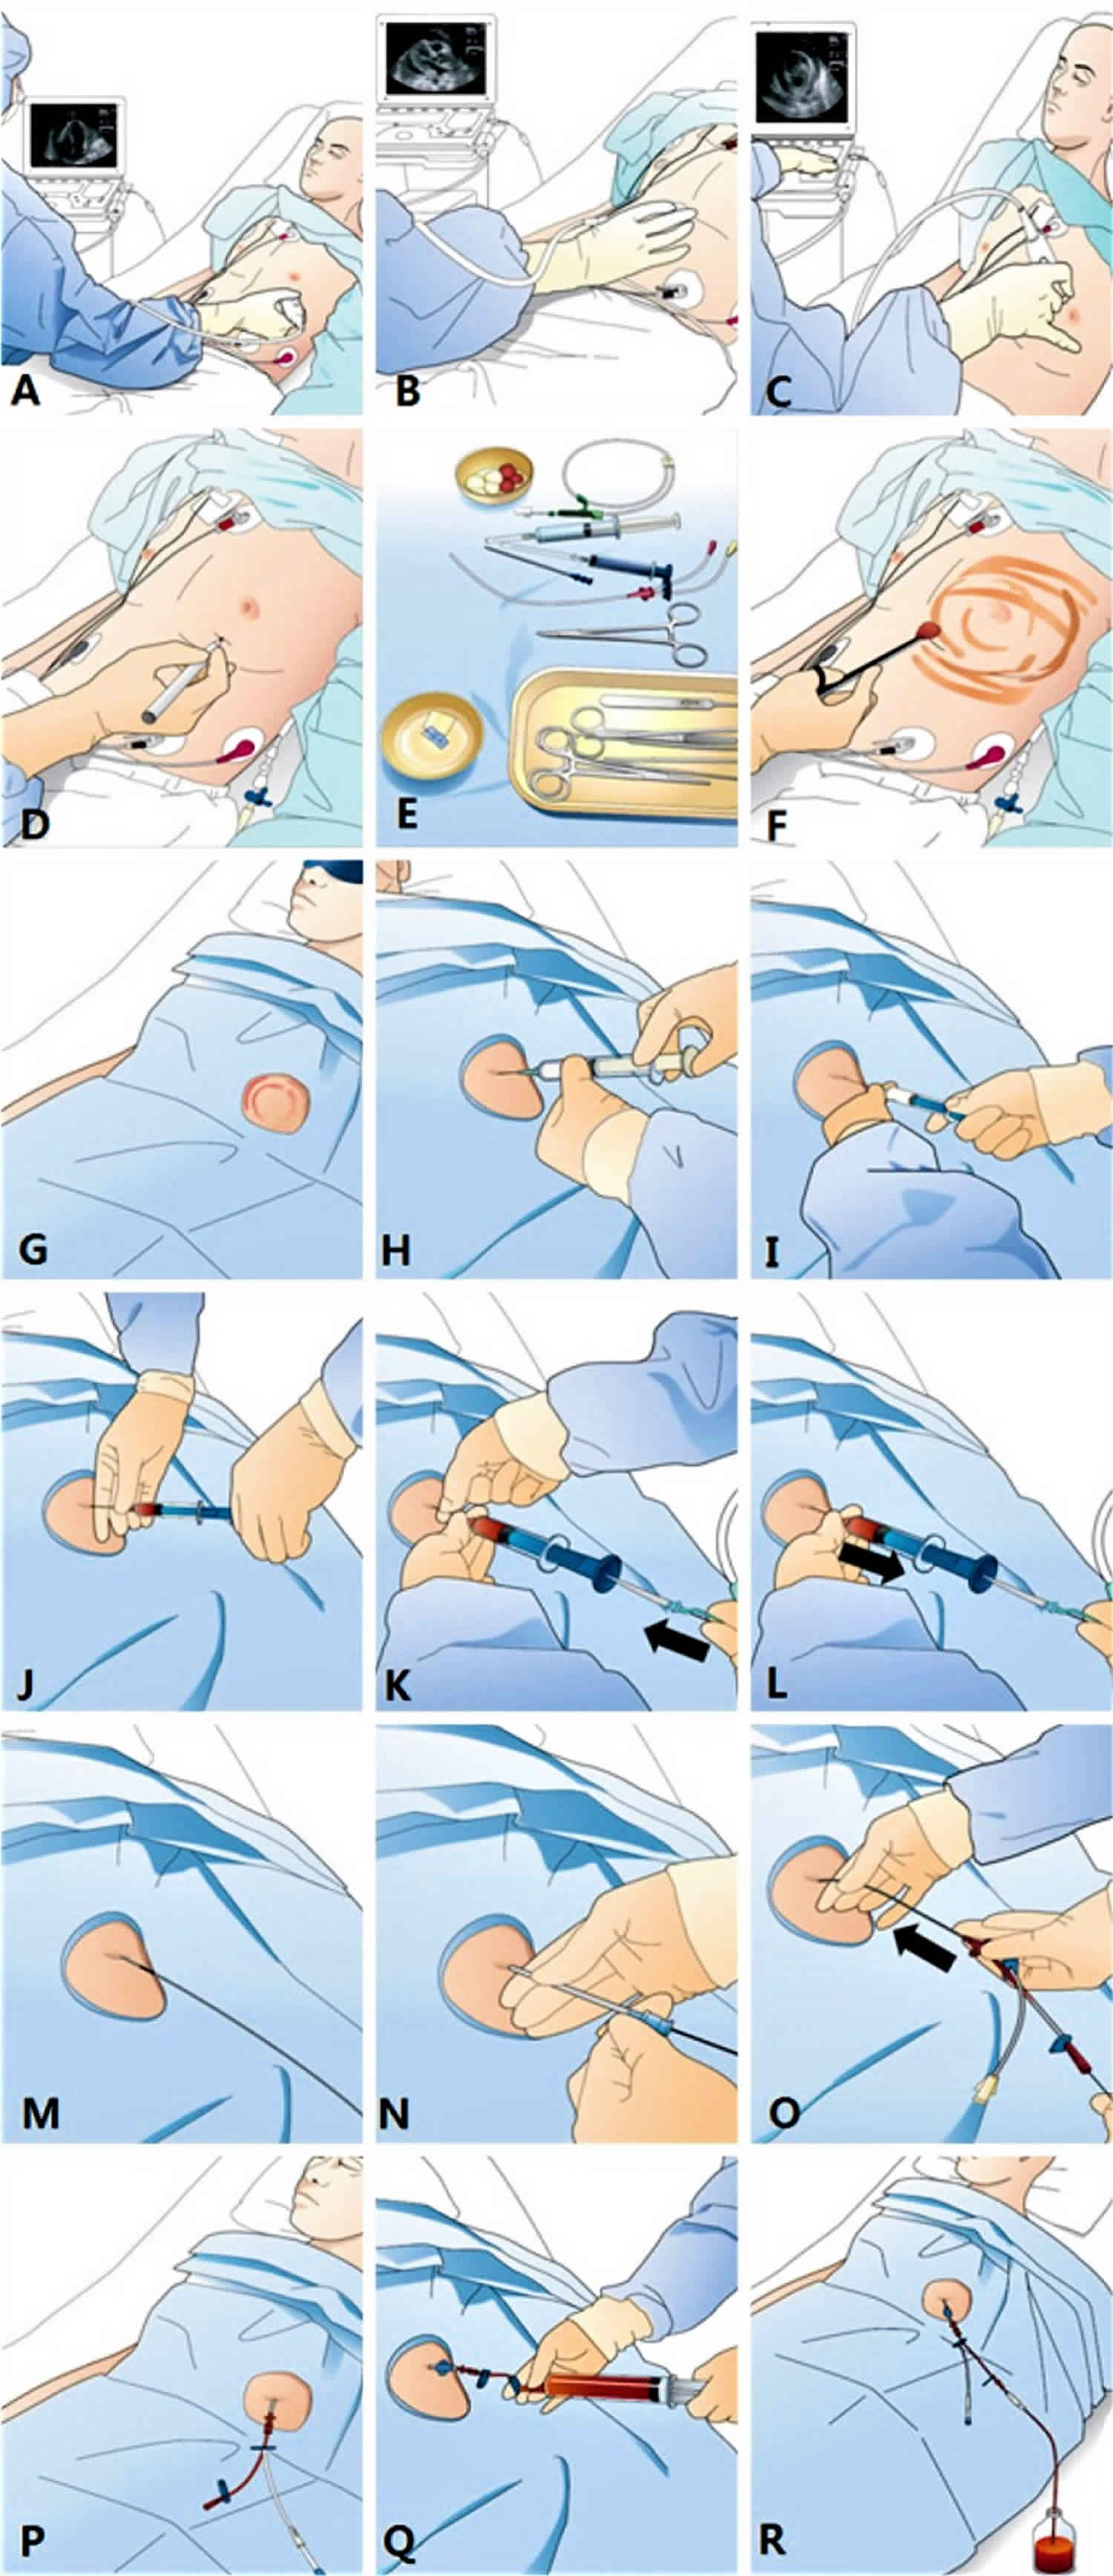
Echocardiography-guided pericardiocentesis can be performed in the following sequences:
- Check clinical indications and medical history, such as taking anti-platelet or anti-coagulation drugs, and get a consent form.
- Positioning and echocardiographic imaging:
- a) Position the patient in the semi-fowler position in bed.
- b) Perform 2D echocardiographic imaging at the apical view (Figure 1A), subxyphoid view (Figure 1B), and left para-sternal view (Figure 1C) to gain insight into the effusion.
- Determination of puncture site:
- a) Choose sites with the biggest echo-free space for safe needle entry, and mark it using a pen or nail tip on the site (Figure 1D).
- b) Image and determine the 3-dimensional direction of needle entry.
- Preparation of puncture site:
- a) Prepare all requisite tools for the centesis on the table (Figure 1E) and perform the sterile skin preparation (Figure 1F).
- b) Cover the patient with a surgical drape and the patient’s eyes with an eye patch to reduce tension and anxiety (Figure 1G).
- c) Perform sufficient local anesthesia at the puncture site (Figure 1H).
- Pericardiocentesis:
- a) Perform a preliminary exploration with the local anesthetic needle (21 gauge) to confirm the direction of the needle approach and to feel the nature of the effusion.
- b) Put the puncture needle (18 gauge) to the tip of the puncture syringe.
- c) Gently insert and advance the puncture needle from the skin of the puncture site toward the heart in the breath holding state. The puncture needle must maintain the direction that was determined during the preliminary exploratory test (Figure 1I).
- d) Feel the “pop” moment at the puncture and observe negatively drained fluid in the syringe (Figure 1J).
- e) Stop the advancing puncture needle and hold the needle with your fingers to prevent further advancement. Insert a smooth tip guidewire through a back-hole in the syringe, sufficiently into the pericardial space (Figure 1K).
- f) Remove the puncture syringe with the needle (Figure 1L), keep ing the guidewire in the pericardial space (Figure 1M).
- g) After dilatation of the pathway (Figure 1N), insert a double lu men indwelling catheter over the guidewire into the pericardial space (Figure 1O).
- h) Remove the guidewire with the remaining indwelling catheter in the pericardial space.
- i) Confirm the success of the procedure by manual drainage with a syringe (Figure 1Q) or a saline bubble test with echocardiography. The patient’s reduced or relieved symptoms soon after the drainage, even by a small amount, is additional evidence of success.
- j) Suture the catheter on the skin and continue to drain the effusion into a bottle (Figure 1R).
Figure 1. Pericardiocentesis technique
What can you expect after pericardiocentesis?
After some or all of the fluid is drained, the tube may be removed right away. Or the tube may be left in for up to a few days. Pressure is applied to the injection site for several minutes to stop any bleeding.
After the procedure, you will have a chest X-ray to check for possible puncture and collapse of your left lung. You will be closely watched for several hours. Your care team will check your blood pressure, heart rate, and breathing rate.
Some of the fluid may be tested to try to find the cause of the fluid buildup. Some results will be ready within hours. Others may take days or weeks.
Follow-up care is a key part of your treatment and safety. Be sure to make and go to all appointments, and call your doctor or nurse call line if you are having problems. It’s also a good idea to know your test results and keep a list of the medicines you take.
Pericardiocentesis complications
Pericardiocentesis complications may include:
- Bleeding
- Collapsed lung
- Heart attack
- Infection (pericarditis)
- Irregular heartbeats (arrhythmias)
- Puncture of the heart muscle, coronary artery, lung, liver, or stomach
- Pneumopericardium (air in the pericardial sac)
- Little WC, Freeman GL. Pericardial disease. Circulation. 2006;113:1622–1632.[↩]
- Braunwalt E. Pericardial disease. In: Fausi AS, Braunwalt E, Kasper DL, et al., editors. Harrison’s internal medicine. 17th ed. New York: McGraw Hill Medical; 2008. pp. 1488–1492.[↩]
- Oh JK, Seward JB, Tajik AJ. Pericardial diseases. In: Oh JK, Seward JB, Tajik AJ, editors. The echo manual. 3rd ed. Philadelphia: Lippincott Williams and Wilkins (Wolters Kluwers); 2007. pp. 289–292.[↩]
- Munt BI, Moss RR, Grewal J. Pericardial disease. In: Otto CM, editor. The practice of clinical echocardiography. 4th ed. Philadelphia: Saunders/Elservier; 2011. pp. 565–578.[↩]
- Management strategies in pericardial emergencies. Seferović PM, Ristić AD, Imazio M, Maksimović R, Simeunović D, Trinchero R, Pankuweit S, Maisch B. Herz. 2006 Dec; 31(9):891-900.[↩]
- Jung HO. Pericardial effusion and pericardiocentesis: role of echocardiography. Korean Circ J. 2012;42(11):725-34. https://www.ncbi.nlm.nih.gov/pmc/articles/PMC3518705/[↩][↩]
- Loukas M, Walters A, Boon JM, Welch TP, Meiring JH, Abrahams PH. Pericardiocentesis: a clinical anatomy review. Clin Anat. 2012;25:872–881.[↩][↩][↩]
- Spodick DH. Acute cardiac tamponade. N Engl J Med. 2003;349:684–690.[↩]
- Maisch B, Seferović PM, Ristić AD, et al. Guidelines on the diagnosis and management of pericardial diseases executive summary; The Task force on the diagnosis and management of pericardial diseases of the European society of cardiology. Eur Heart J. 2004;25:587–610[↩][↩][↩]
- McDonald JM, Meyers BF, Guthrie TJ, Battafarano RJ, Cooper JD, Patterson GA. Comparison of open subxiphoid pericardial drainage with percutaneous catheter drainage for symptomatic pericardial effusion. Ann Thorac Surg. 2003;76:811–815. discussion 816.[↩]
- Guidelines on the diagnosis and management of pericardial diseases executive summary; The Task force on the diagnosis and management of pericardial diseases of the European society of cardiology. Maisch B, Seferović PM, Ristić AD, Erbel R, Rienmüller R, Adler Y, Tomkowski WZ, Thiene G, Yacoub MH, Task Force on the Diagnosis and Management of Pricardial Diseases of the European Society of Cardiology. Eur Heart J. 2004 Apr; 25(7):587-610.[↩]
- Pericardiocentesis guided by 2-D echocardiography: the method of choice for treatment of pericardial effusion. Lindenberger M, Kjellberg M, Karlsson E, Wranne B. J Intern Med. 2003 Apr; 253(4):411-7.[↩]
- Maisch B, Seferović PM, Ristić AD, et al. Guidelines on the diagnosis and management of pericardial diseases executive summary; The Task force on the diagnosis and management of pericardial diseases of the European society of cardiology. Eur Heart J. 2004;25:587–610.[↩]
- Kil UH, Jung HO, Koh YS, et al. Prognosis of large, symptomatic pericardial effusion treated by echo-guided percutaneous pericardiocentesis. Clin Cardiol. 2008;31:531–537[↩]
- Halpern DG, Argulian E, Briasoulis A, Chaudhry F, Aziz EF, Herzog E. A novel pericardial effusion scoring index to guide decision for drainage. Crit Pathw Cardiol. 2012;11:85–88.[↩]


