Contents
What is a skin graft
Skin grafting is a closure technique used in dermatology most commonly to close wounds created by the removal of skin cancer. Your skin covers the entire body, and acts as a protective barrier. A skin graft is required when the area of skin loss is too big to be closed using local skin and stitches alone. The skin graft covers the wound and attaches itself to the cells beneath and begins to grow in its new location. If a skin graft wasn’t performed, the area would be an open wound and take much longer to heal.
Skin grafts may be recommended for:
- Burns
- Specific surgeries that may require skin grafts for healing to occur
- Areas where there has been infection that caused a large amount of skin loss
- Cosmetic reasons or reconstructive surgeries where there has been skin damage or skin loss
- Skin cancer surgery
- Surgeries that need skin grafts to heal
- Venous ulcers, pressure ulcers, or diabetic ulcers that do not heal
- Very large wounds
- A wound that the surgeon has not been able to close properly .
The most common sites of harvest for skin grafts are the buttocks and inner thigh, areas which are usually hidden and therefore cosmetically less important.
Although currently less favored than flap closures, skin grafting can produce a good cosmetic result. Skin grafts, in contrast to flaps, are completely removed from their blood supply, whereas flaps remain attached to a blood supply via a pedicle. Skin grafts are less technically difficult but can be more time-consuming as the procedure creates a second surgical site. Skin grafts can be divided into several categories based on the composition of the graft with each type of graft having unique risks and indications.
- Split-thickness skin grafts (partial-thickness skin grafts) are composed of the epidermis and a superficial part of the dermis. Split-thickness skin graft is taken by shaving the surface layers (epidermis and a variable thickness of dermis) of the skin with a large knife called a dermatome. The shaved piece of skin is then applied to the wound. Split-thickness skin graft is often taken from the leg. A split skin graft is often used after excision of a lesion on the lower leg.
- Full-thickness skin grafts contain both the full epidermis and dermis. Full-thickness skin grafts are done when a lot of tissue is lost. This can happen with open fractures of the lower leg, or after severe infections. Full-thickness skin graft is taken by removing all the layers of the skin with a scalpel (a Wolfe graft). It is done in a similar way to skin excision. The piece of skin is cut into the correct shape, then applied to the wound. This type of skin graft is often taken from the arm, neck or behind the ear. It is often used after excisions on the hand or face.
- Composite grafts contain skin and another type of tissue, usually cartilage.
Full-thickness skin grafts are the most commonly used graft in dermatology. Full-thickness skin grafts can provide an excellent tissue match for the host site and heal with minimal scarring and contracture. Composite grafts also have a high metabolic demand and typically are only used in the nose and ear in situations where cartilage also needs to be replaced. Split-thickness grafts are typically less cosmetically appealing due to a lack of adnexal structures and color mismatch. There is also a significant risk of contracture with split thickness skin graft. Split-thickness graft donor sites also tend to be more painful for the patient compared to full-thickness skin graft 1.
Skin grafting requires a good vascular supply for the survival of the tissue and a good donor match for an acceptable cosmetic result. Donor sites should match in the thickness, color, texture, and adnexal structures 2. Donor sites should match the actinic damage of the graft site as well, but it is more important the area be free of cancerous and precancerous lesions 1. If possible, donor sites should not transfer hair-bearing skin to non-hair-bearing areas. Epilation can be used to remove unwanted hair growth after the graft has healed. Common donor sites for facial full-thickness skin grafts are supraclavicular, preauricular, postauricular, and inner arm. The conchal bowl is a good source of sebaceous skin for grafts of the nose 3. Donor sites for split-thickness skin graft are typically the trunk, buttock, thighs, or inner arm 4.
Figure 1. Skin anatomy
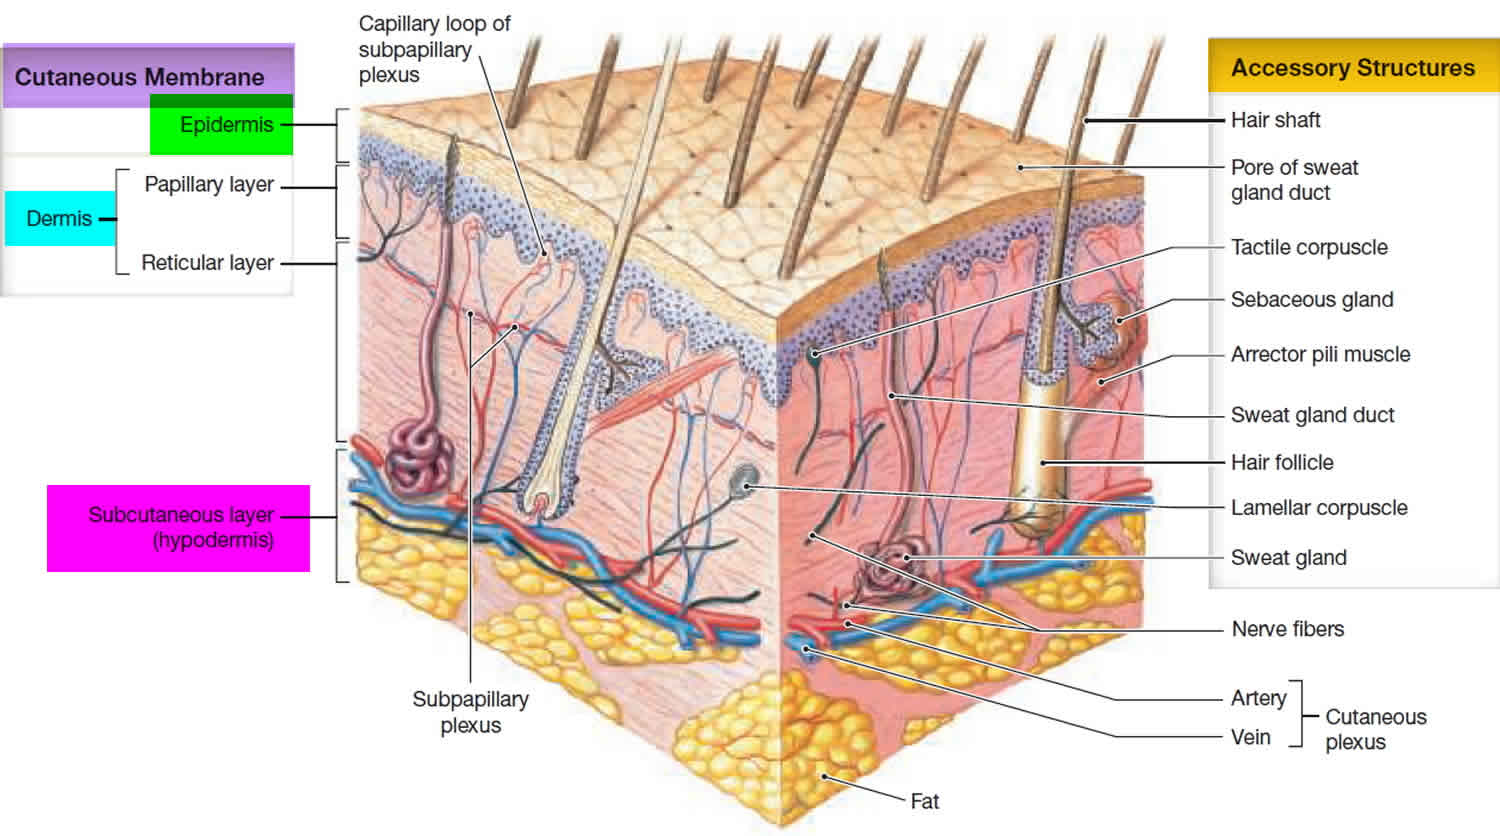
Figure 2. Split-thickness skin graft
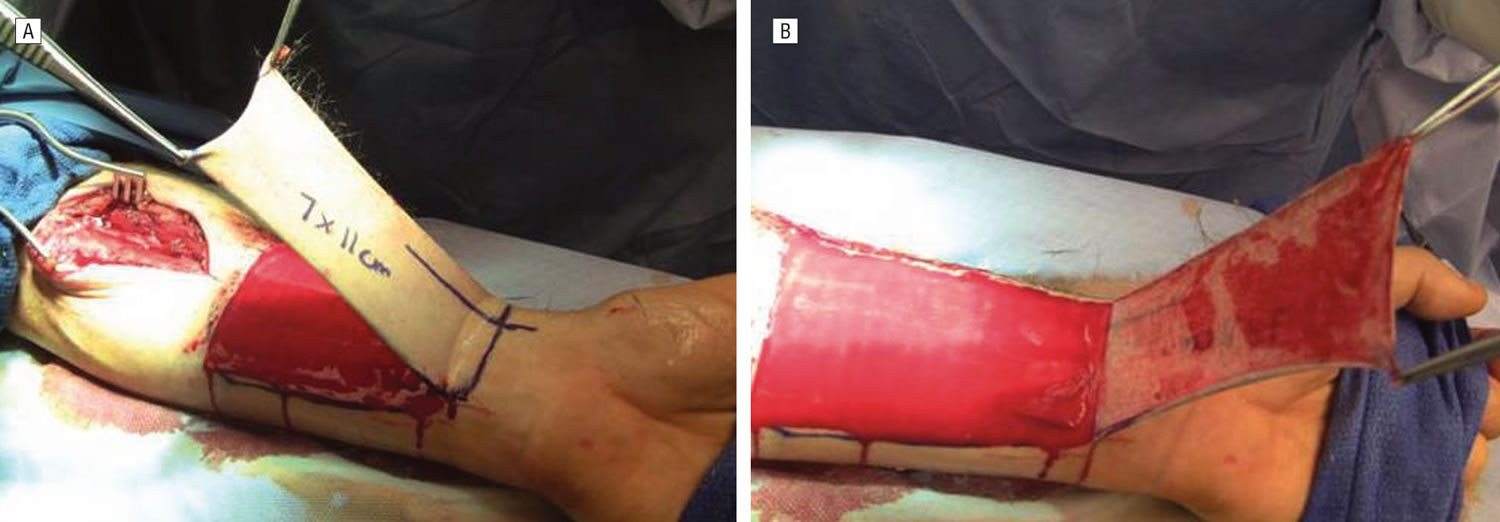
Footnote: (A and B) Harvest, application, and immobilization of the hinged split-thickness skin graft for radial forearm free flap repair.
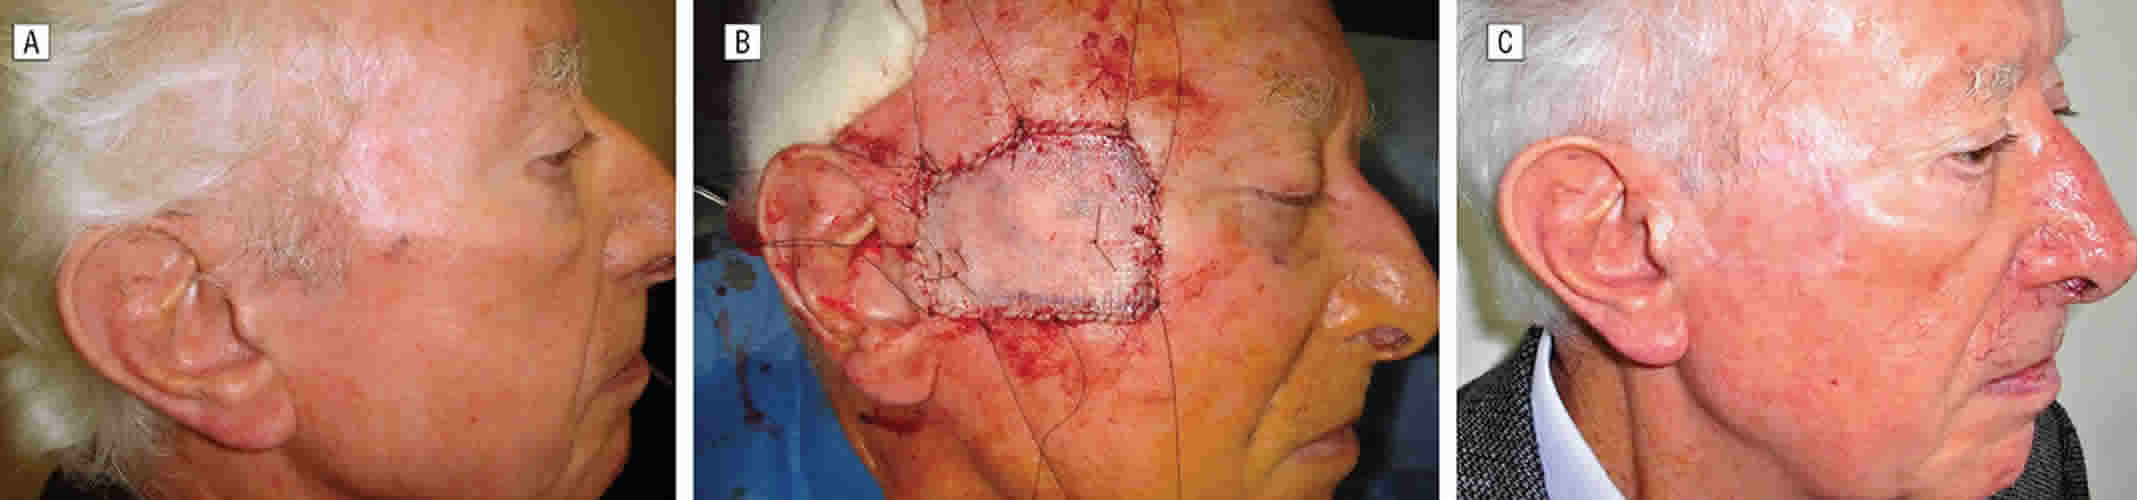
[Source 5 ]Figure 3. Full-thickness skin graft
Skin graft indications
In general, surgeons should choose the simplest closure that will provide the best cosmetic result. Skin grafts are typically considered when secondary intent, primary closure, or flap closure are not adequate for closing the wound 7.
Split-Thickness Skin Grafts
Split-thickness skin grafts (partial-thickness skin grafts) are indicated for large wounds and can survive on relatively avascular sites where an full-thickness skin graft would typically fail. Split-thickness skin grafts are typically reserved for sites that are too large for an full-thickness skin graft or flap 1.
Full-Thickness Skin Grafts
Full-thickness skin grafts are indicated for small avascular areas less than 1 cm or for larger areas with good blood supply as the metabolic demands of the additional adnexal structures of full-thickness skin grafts increase the likelihood of necrosis 8. Large grafts over bone or cartilage without any intervening tissue are prone to failure. Delayed grafting or using hinge flaps to cover the exposed avascular tissue are some options to allow for placement of full-thickness skin graft.
Composite Grafts
Composite grafts are indicated in situations where a donor site has lost underlying muscle or bone. The most common composite graft in dermatologic surgery are grafts containing cartilage used to reinforce the nose or ear 1.
Skin graft contraindications
Absolute contraindications for grafting include incomplete removal of cancer, active infection, and uncontrolled bleeding.
Relative contraindications include smoking, an anticoagulant medication, bleeding disorder, chronic corticosteroids, or malnutrition 9. Smoking significantly compromises oxygenation of tissue and should be stopped before graft placement if possible. Heavy smokers (more than 1 pack per day) have been found to be 3 times more likely to experience necrosis of their flaps 6. Smoking should be discontinued at least 2 days before surgery and not resumed for at least 1 week after graft placement.
Graft survival depends on the ingrowth of capillaries from the recipient site for survival, so a viable base of tissue with some vascularity is needed.
Split-thickness skin grafts should not be used near free margins due to their increased risk of contracture.
Full-thickness skin grafts should not be used on avascular site greater than 1 cm 8. Therefore, full-thickness skin grafts should not be placed in defects of any size without an underlying blood supply. For example, large (> 1 cm) areas of exposed bone or cartilage are not optimal for graft placement 6.
Skin graft procedure
Before the skin graft procedure, tell your doctor if you are taking any medication (particularly aspirin, clopidogrel, dabigatran and warfarin, which could make you bleed more), or if you have any allergies, medical conditions, or a pacemaker or implanted defibrillator. Remember, to tell your doctor about any over-the-counter supplements and herbal remedies as a number of these can also lead to abnormal bleeding.
During the days before skin graft surgery:
- You may be asked to stop taking medicines that make it hard for your blood to clot. These include aspirin, ibuprofen, warfarin (Coumadin), and others.
- Ask your surgeon which drugs you should still take on the day of your surgery.
- If you smoke, try to stop. Smoking increases your chance of problems such as slow healing. Ask your health care provider for help quitting.
On the day of the skin graft surgery:
- Follow instructions about when to stop eating and drinking.
- Take the drugs your surgeon told you to take with a small sip of water.
Skin graft surgery is usually done while you are under general anesthesia. That means you will be asleep and pain-free.
Healthy skin is taken from a place on your body called the donor site. Most people who are having a skin graft have a split-thickness skin graft. This takes the two top layers of skin from the donor site (the epidermis) and the layer under the epidermis (the dermis).
After the excision (excision biopsy), your surgeon will measure the area of the wound to know what size to make the skin graft. A piece of skin will be shaved or cut from another part of your body (e.g. leg or arm) that is large enough to cover the wound. The donor site can be any area of the body. Most times, it is an area that is hidden by clothes, such as the buttock or inner thigh. When possible, skin of similar thickness and color will be selected.
The piece of skin graft is carefully spread on the bare area where it is being transplanted. The skin graft is held in place either by gentle pressure from a well-padded dressing that covers it, or by staples or a few small stitches. A special dressing will be applied directly over the skin graft and often sutured in place. A outer pressure dressing will then be applied to protect the wound. The donor-site area is covered with a sterile dressing for 3 to 5 days.
Usually this dressing is left in place for approximately seven days until you see your surgeon or nurse again. Make sure you have received instructions on how to care for the wound and when to get the stitches out. It is important to limit movement of the area for 2-3 days to allow time for the skin graft to adhere and develop a blood supply from the wound bed.
People with deeper tissue loss may need a full-thickness skin graft. This requires an entire thickness of skin from the donor site, not just the top two layers.
A full-thickness skin graft is a more complicated procedure. Common donor sites for full-thickness skin grafts include the chest wall, back, or abdominal wall.
Full-Thickness Skin Graft Procedure
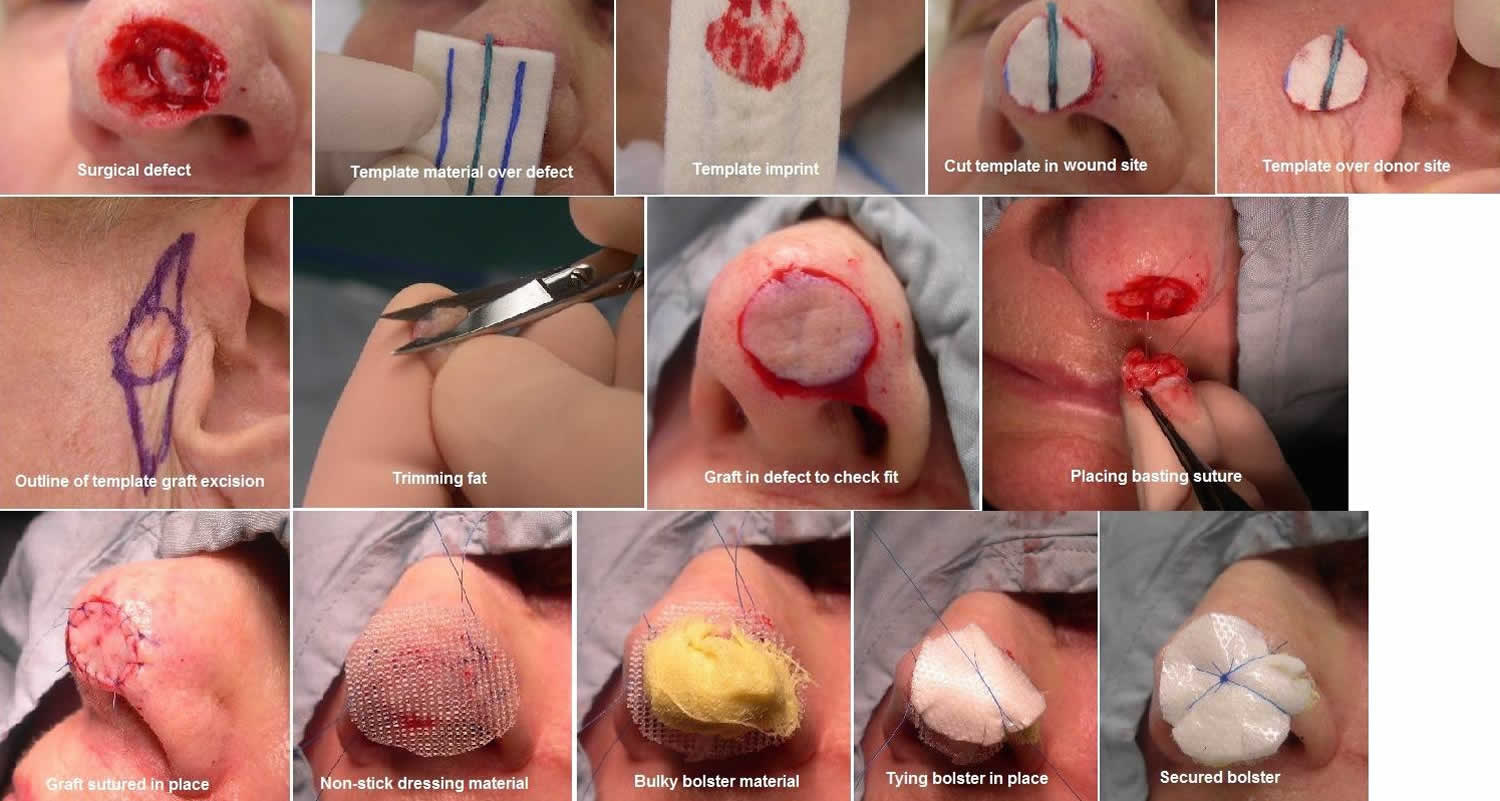
After selection of a donor site, both sites are sterilely prepped, draped, and anesthetized. A template of the defect can be made using a gauze, measurements or foil from the suture packaging. This template is then transposed onto the donor site. Classically, the donor site should be closed with a length to width ratio of 3:1, but Wang et al. 10 suggested that this ratio may not be necessary for donor sites, which could leave smaller donor defects. Some debate exists in the literature on the proper sizing of the skin graft. In general, skin grafts are oversized by 10% to 20% to allow for contraction and to allow contouring of the skin graft 11. However, some others have suggested that grafts should be undersized by up to 10% to 20% to prevent puckering or pincushioning of the skin graft 12. This suggests that there is leeway in terms of graft size, especially when grafts that are too small can be meshed to increase the size of the graft. Full-thickness skin graft can be harvested using a standard excision technique. After the graft is removed, it is placed in sterile saline while hemostasis is achieved at the donor site. The graft is subsequently defatted using a scalpel or scissors. An alternative method would be to take the deep margin of the graft just above the subcutaneous fat, which eliminates the defatting step. The graft should be contoured to the size of the defect and placed in the wound bed as quickly as possible. It is imperative that the graft is placed in apposition to the wound bed to reduce the risk of graft failure. Typically, grafts are sutured with a quickly absorbing suture, such as chromic gut or a non-absorbable suture such as nylon. For large grafts or at the preference of the surgeon, basting sutures can be placed. Basting suture should be placed first to allow for hemostasis of bleeding induced by suture placement. After hemostasis of the wound bed is achieved, the graft edges are sutured into place with an emphasis placed on apposition of the wound bed and graft. After the graft is sutured in place, a bolster is placed over the graft to further assist in apposition. A variety of different products are available to use as bolsters, such as petroleum impregnated gauze. The bolster and overlying pressure dressing are used to secure the graft in place and to prevent desiccation of the graft. The bolster and pressure dressing can be removed in 1 week followed by removal of nonabsorbable sutures, if they are used, in approximately 2 weeks.
Split-Thickness Skin Grafts Procedure
There are a variety of techniques and tools available to the dermatologic surgeon performing a split-thickness skin graft. In general, the skin is sterilely prepped and then thoroughly cleansed with sterile saline to wash off the antiseptic and prevent desiccation. The area is then anesthetized. For powered dermatomes, mineral oil or antibiotic ointment can be used to lubricate and hydrate the skin. A split-thickness skin graft includes the epidermis and part of the dermis. Some devices allow the surgeon to set the desired thickness for the graft. The dermatome applied firmly against the skin with downward and forward pressure. An assistant can use forceps to gently grasp and apply traction to prevent the graft from folding in on itself. If desired, the graft can be subsequently meshed; meshing in favored in larger grafts. The graft is then applied to the defect and contoured to fit the defect. The graft is then anchored in place using sutures or staples depending on physician preference. A bolster is applied over the graft. The donor site can be treated like an abrasion and covered with petrolatum and a bandage.
Skin graft recovery
You should recover quickly after split-thickness skin grafting. Full-thickness grafts need a longer recovery time. If you received this kind of graft, you may need to stay in the hospital for 1 to 2 weeks.
After you are discharged from the hospital, follow instructions on how to care for your skin graft, including:
- Wearing a dressing for 1 to 2 weeks. Ask your provider how you should care for the dressing, such as protecting it from getting wet.
- Protecting the graft from trauma for 3 to 4 weeks. This includes avoiding being hit or doing any exercise that might injure or stretch the graft.
- Getting physical therapy, if your surgeon recommends it.
Skin graft surgery risks
Risks for anesthesia are:
- Reactions to medicines
- Problems with breathing
Risks for this surgery are:
- Bleeding
- Chronic pain (rarely)
- Infection
- Loss of grafted skin (the graft not healing, or the graft healing slowly)
- Reduced or lost skin sensation, or increased sensitivity
- Scarring
- Skin discoloration
- Uneven skin surface
Skin graft scar
It is impossible to cut the skin without scarring of some degree. The final cosmetic result of a skin graft depends on many factors including the type of skin graft, the location, the size and depth of the wound, and patient factors. Because skin grafts are effectively a patch without their own blood supply and sometimes of less thickness than the wound they are applied to, the final appearance may not be as close to normal as it would be if the wound was able to be closed in a straight line or with a skin flap. The have a tendency to look paler and flatter than the surrounding skin with time.
You will have two scars, the scar where the skin graft has been applied and the scar from where the skin graft was taken (donor site). The donor site for a full thickness skin graft will usually be closed in a straight line with stitches. The donor site for a split thickness graft however will consist of a superficial graze and will heal itself more slowly (initially under a special dressing). This grazed area can often be tender post-operatively and require some oral pain relief such as paracetamol.
Some people have an abnormal response to skin healing resulting in larger scars than usual (keloid or hypertrophic scarring).
Skin graft care
You will have two wounds, the site of the original lesion and the site where the skin graft was taken from (donor site).
Your wounds may become tender an hour or two after the excision when the effect of the local anesthetic wears off.
Skin grafts are very fragile and great care must be taken when looking after them. Leave the dressing in place as advised by your surgeon. Avoid strenuous exertion and stretching of the area until the stitches are removed and for some time afterwards.
If there is any bleeding, press on the wound firmly with a folded towel for 20 minutes (without removing the original dressing). If it is still bleeding after this time, seek medical attention. Do not rub the area as this may disturb the graft.
Keep the wounds dry until your surgeon advises that you can wash them. If the wounds become red or very painful, consult your surgeon: they could be infected.
When you go home after surgery, you will have a dressing on your wounds. The dressing does several things, including:
- Protect your wound from germs and reduce the risk of infection
- Protect the area as it heals
- Soak up any fluids that leak from your wound
To care for the graft site:
- You may need to rest for several days after surgery as your wound heals.
- The type of dressing you have depends on the type of wound and where it is.
- Keep the dressing and area around it clean and free from dirt or sweat.
- DO NOT let the dressing get wet.
- DO NOT touch the dressing. Leave it in place for as long as your doctor recommends (about 4 to 7 days).
- Take any medicines or pain relievers as directed.
- If possible, try to elevate the wound so it is above your heart. This helps reduce swelling. You may need to do this while sitting or lying down. You can use pillows to prop up the area.
- If your doctor says it is OK, you may use an ice pack on the bandage to help with swelling. Ask how often you should apply the ice pack. Be sure to keep the bandage dry.
- Avoid any movement that might stretch or injure the flap or graft. Avoid hitting or bumping the area.
- You will need to avoid strenuous exercise for several days. Ask your doctor for how long.
- If you have a vacuum dressing, you may have a tube attached to the dressing. If the tube falls off, tell your doctor.
- You will probably see your doctor to have your dressing changed in 4 to 7 days. You may need to have the dressing to your flap or graft site changed by your doctor a couple times over 2 to 3 weeks.
- As the site heals, you may be able to care for it at home. Your doctor will show you how to care for your wound and apply dressings.
- The site may become itchy as it heals. DO NOT scratch the wound or pick at it.
- Apply SPF 30 or higher sunscreen to surgical sites if exposed to the sun.
To care for the donor site:
- Leave the dressing in place. Keep it clean and dry.
- Your doctor will remove the dressing in about 4 to 7 days, or give you instructions for how to remove it.
- After the dressing is removed, you may be able to leave the wound uncovered. However, if it is in an area that is covered by clothing, you will want to cover the site to protect it. Ask your doctor what type of dressing to use.
- DO NOT apply any lotions or creams to the wound unless your doctor tells you to. As the area heals, it may itch and scabs may form. DO NOT pick scabs or scratch the wound as it heals.
Bathing or Showering
Your doctor will let you know when it is OK to bathe after surgery. Keep in mind:
- You may need to take sponge baths for 2 to 3 weeks while your wounds are in the early stages of healing.
- Once you get the OK to bathe, showers are better than baths because the wound does not soak in water. Soaking your wound could cause it to reopen.
- Be sure to protect your dressings while you bathe to keep them dry. Your doctor may suggest covering the wound with a plastic bag to keep it dry.
- If your doctor gives the OK, gently rinse your wound with water as you bathe. Do not rub or scrub the wound. Your doctor may recommend special cleansers to use on your wounds.
- Gently pat dry the area around your wound with a clean towel. Let the wound air dry.
- Do not use soaps, lotions, powders, cosmetics, or other skin care products on your wound unless told to do so by your doctor.
At some point during the healing process, you will not need a dressing anymore. Your doctor will tell you when you can leave your wound uncovered and how to care for it.
See your doctor if:
- Pain gets worse or does not improve after taking pain relievers
- You have bleeding that won’t stop after 10 minutes with gentle, direct pressure
- Your dressing comes loose
- Edges of the graft or flap start to come up
- You feel something bulging out of the graft or flap site
Also see your doctor if you notice signs of an infection, such as:
- Increased drainage from the wound
- Drainage becoming thick, tan, green, or yellow, or smells bad (pus)
- Your temperature is above 100°F (37.8°C) for more than 4 hours
- Red streaks appear that lead away from the wound
Skin Graft Donor Site Care
Equipment
- Fluid aspiration:
- 20-gauge sterile needle
- 20 cc sterile syringe
- Small piece of transparent film dressing
- Clean gloves
- Changing transparent film:
- Sterile 4 x 4 gauze dressing
- Skin Prep
- Transparent film dressing (large enough to cover wound)
- Clean gloves
Procedure
- Postoperative Day 1:
- Wash hands.
- Put on clean gloves.
- Remove Ace wrap or gauze leaving transparent film in place.
- Position patient to facilitate dependent pooling of exudate.
- Assess need to aspirate fluid (when fluid accumulation is large enough to cause dressing to be tight or bulging in the dependent area).
- If aspiration is needed, refer to 3.a. of this procedure.
- If purulence or evidence of cellulitis of surrounding tissue is noted, notify the physician and obtain wound culture. Future dressings to be ordered per physician.
- Leave site without gauze or Ace wrap covering.
- Subsequent postoperative days
- Every shift:
- Position patient to facilitate dependent pooling of exudate.
- Assess site for reaccumulation of fluid.
- If purulence or evidence of cellulitis of surrounding tissue is noted, notify physician and obtain wound culture. Future dressing to be ordered per physician.
- Aspirate fluid accumulation as needed (ie, fluid accumulation is large enough to cause dressing to be tight or bulging in the dependent area).
- Every shift:
- Managing excessive fluid accumulation
- Fluid aspiration (aspirate fluid only as needed to keep dressing from leaking):
- Wash hands.
- Put on clean gloves.
- Position patient to facilitate dependent pooling of exudate.
- Aspirate accumulated fluid with needle and syringe.
- Patch needle hole with new piece of transparent film.
- Leave site without gauze or Ace wrap covering.
- Managing leakage (exudate may seep out of edges of transparent film dressing). If this occurs:
- Pat dressing and surrounding skin dry.
- Apply Skin Prep to skin surrounding leaking edge and allow to dry.
- Patch leaking edge with additional piece of transparent film.
- Changing transparent film dressing (if transparent film dressing becomes completely dislodged from donor site):
- Wash hands.
- Put on clean gloves.
- Gently pat donor site and surrounding skin dry with sterile 4 x 4 gauze.
- Apply Skin Prep to skin surrounding donor site and allow to dry.
- Place new piece of transparent film dressing on donor site. Transparent film dressing should be large enough to cover donor site with at least a 1 inch border of healthy intact skin surrounding donor site.
- Fluid aspiration (aspirate fluid only as needed to keep dressing from leaking):
- Precautions, considerations, and observations
- Transparent film dressings are initially applied in the operating room and covered with gauze or Ace wrap to promote hemostasis and minimize exudate.
- Do not remove transparent film unless a leak cannot be managed. Changing the transparent film dressing is associated with increased risk of infection.
- The transparent film dressing should be removed 7 to 14 days after surgery. After removal, cleanse the site gently with saline solution and pat dry.
- Aspirate exudate only when the volume is large enough to cause the dressing to be tight or bulging, which could lead to leaking. The presence of exudate is not harmful to the donor site. Exudate contains substances that promote wound healing.
Skin graft healing
Skin graft survival depends on the ingrowth of capillaries from the recipient site for survival, so a viable base of tissue with some vascularity is needed 6. Provision of vascularity from peripheral to the wound, or “bridging,” may supply up to about 5 mm of the periphery of the graft. A defect without adequate vascularity may be allowed to heal secondarily for a time to allow growth of granulation tissue, and then a delayed graft may be performed. Alternately, a muscle or soft tissue flap may be moved into the wound base, providing a vascular bed for the graft 13. In the first 24 hours after placement, the graft absorbs transudate from the recipient bed and becomes edematous, a stage known as “plasmatic imbibition.” Fibrin acts as a physiologic adhesive that holds the graft in place during this time. The fibrin is eventually replaced by granulation tissue. Vascular anastomoses between the recipient bed and donor graft begin to develop at about 48 to 72 hours after grafting. This process is known as “inosculation.” Full circulation is restored within 4 to 7 days, and a lymphatic circulation occurs within 7 days. Although re-innervation of the graft begins 2 to 4 weeks after grafting, full sensation may require several months or even years to return to normal.
Skin graft failure symptoms
Sometimes the skin graft does not survive the transfer to the new site. This usually happens within the first two weeks after the skin graft procedure. Impending skin graft failure can be indicated by a porcelain white graft or overly black eschar typically seen 1-2 weeks after grafting 2. These findings, however, may only indicate superficial necrosis with the survival of the dermal component of the graft. Therefore, debridement is very rarely indicated shortly after grafting. The patient should be made aware that several weeks after grafting the superficial sloughing or necrosis can be replaced by healthy tissue. Failed grafts should be left in place as they can act as a biologic dressing over the wound which will heal via secondary intention.
The risk of contracture is more significant in split-thickness skin grafts compared to full-thickness skin graft. Due to this risk, split-thickness grafts should not be used near free margins 1.
Grafts are nourished initially by imbibition of nutrients in the wound bed followed by revascularization 12. If a graft’s metabolic demands are too high or if the graft is separated from the wound bed, the graft could fail. Lack of wound bed/graft apposition, trauma, infection, hematoma/seroma formation increases the risk of graft failure. The connection between the wound bed and graft is very fragile and prone to disruption by shearing forces. Meticulous hemostasis can help prevent hematoma formation. Seromas can be avoided with basting sutures, used in large grafts, and as well as meshing the graft. Meshing is a process where one or more incisions are made into the graft. This can also be used to increase the size of the graft. Infection increases the oxidative stress on the graft as well as potentially disrupting the wound bed with abscess formation.
Skin graft failure can happen for a variety of reasons including the accumulation of blood or fluid underneath the graft, and/or wound infection. If this happens, your surgeon will inform you what further treatment is required – a repeat skin graft procedure may be required or the wound may be dressed regularly and left to slowly heal on its own. It is quite normal for the graft to appear dark and crusted on the surface when the dressings are removed early on. This does not necessarily mean it has failed.
- Adams DC, Ramsey ML. Grafts in dermatologic surgery: review and update on full- and split-thickness skin grafts, free cartilage grafts, and composite grafts. Dermatol Surg. 2005 Aug;31(8 Pt 2):1055-67.[↩][↩][↩][↩][↩]
- Prohaska J, Cook C. Skin Grafting. [Updated 2018 Nov 23]. In: StatPearls [Internet]. Treasure Island (FL): StatPearls Publishing; 2018 Jan-. Available from: https://www.ncbi.nlm.nih.gov/books/NBK532874[↩][↩]
- Breach NM. Pre-auricular full-thickness skin grafts. Br J Plast Surg. 1978 Apr;31(2):124-6.[↩]
- Rigg BM. Importance of donor site selection in skin grafting. Can Med Assoc J. 1977 Nov 05;117(9):1028-9.[↩]
- Boahene K, Richmon J, Byrne P, Ishii L. Hinged Forearm Split-Thickness Skin Graft for Radial Artery Fasciocutaneous Flap Donor Site Repair. Arch Facial Plast Surg. 2011;13(6):392–394. doi:10.1001/archfacial.2011.65 https://jamanetwork.com/journals/jamafacialplasticsurgery/fullarticle/1105706[↩]
- Ramsey ML, Patel BC. Full Thickness Skin Grafts. [Updated 2018 Dec 6]. In: StatPearls [Internet]. Treasure Island (FL): StatPearls Publishing; 2018 Jan-. Available from: https://www.ncbi.nlm.nih.gov/books/NBK532875[↩][↩][↩][↩]
- Simman R. Wound closure and the reconstructive ladder in plastic surgery. J Am Col Certif Wound Spec. 2009 Jan;1(1):6-11.[↩]
- Gingrass P, Grabb WC, Gingrass RP. Skin graft survival on avascular defects. Plast. Reconstr. Surg. 1975 Jan;55(1):65-70.[↩][↩]
- Goldminz D, Bennett RG. Cigarette smoking and flap and full-thickness graft necrosis. Arch Dermatol. 1991 Jul;127(7):1012-5.[↩]
- Wang Q, Cai M, Wu YL, Zhang GC. Mathematical guide to minimize donor size in full-thickness skin grafting. Dermatol Surg. 2009 Sep;35(9):1364-7.[↩]
- Hill TG. Contouring of donor skin in full-thickness skin grafting. J Dermatol Surg Oncol. 1987 Aug;13(8):883-8.[↩]
- Zilinsky I, Farber N, Weissman O, Israeli H, Haik J, Domniz N, Winkler E. Defying consensus: correct sizing of full-thickness skin grafts. J Drugs Dermatol. 2012 Apr;11(4):520-3.[↩][↩]
- Fader DJ, Wang TS, Johnson TM. Nasal reconstruction utilizing a muscle hinge flap with overlying full-thickness skin graft. J. Am. Acad. Dermatol. 2000 Nov;43(5 Pt 1):837-40.[↩]

