Contents
What is a tracheostomy
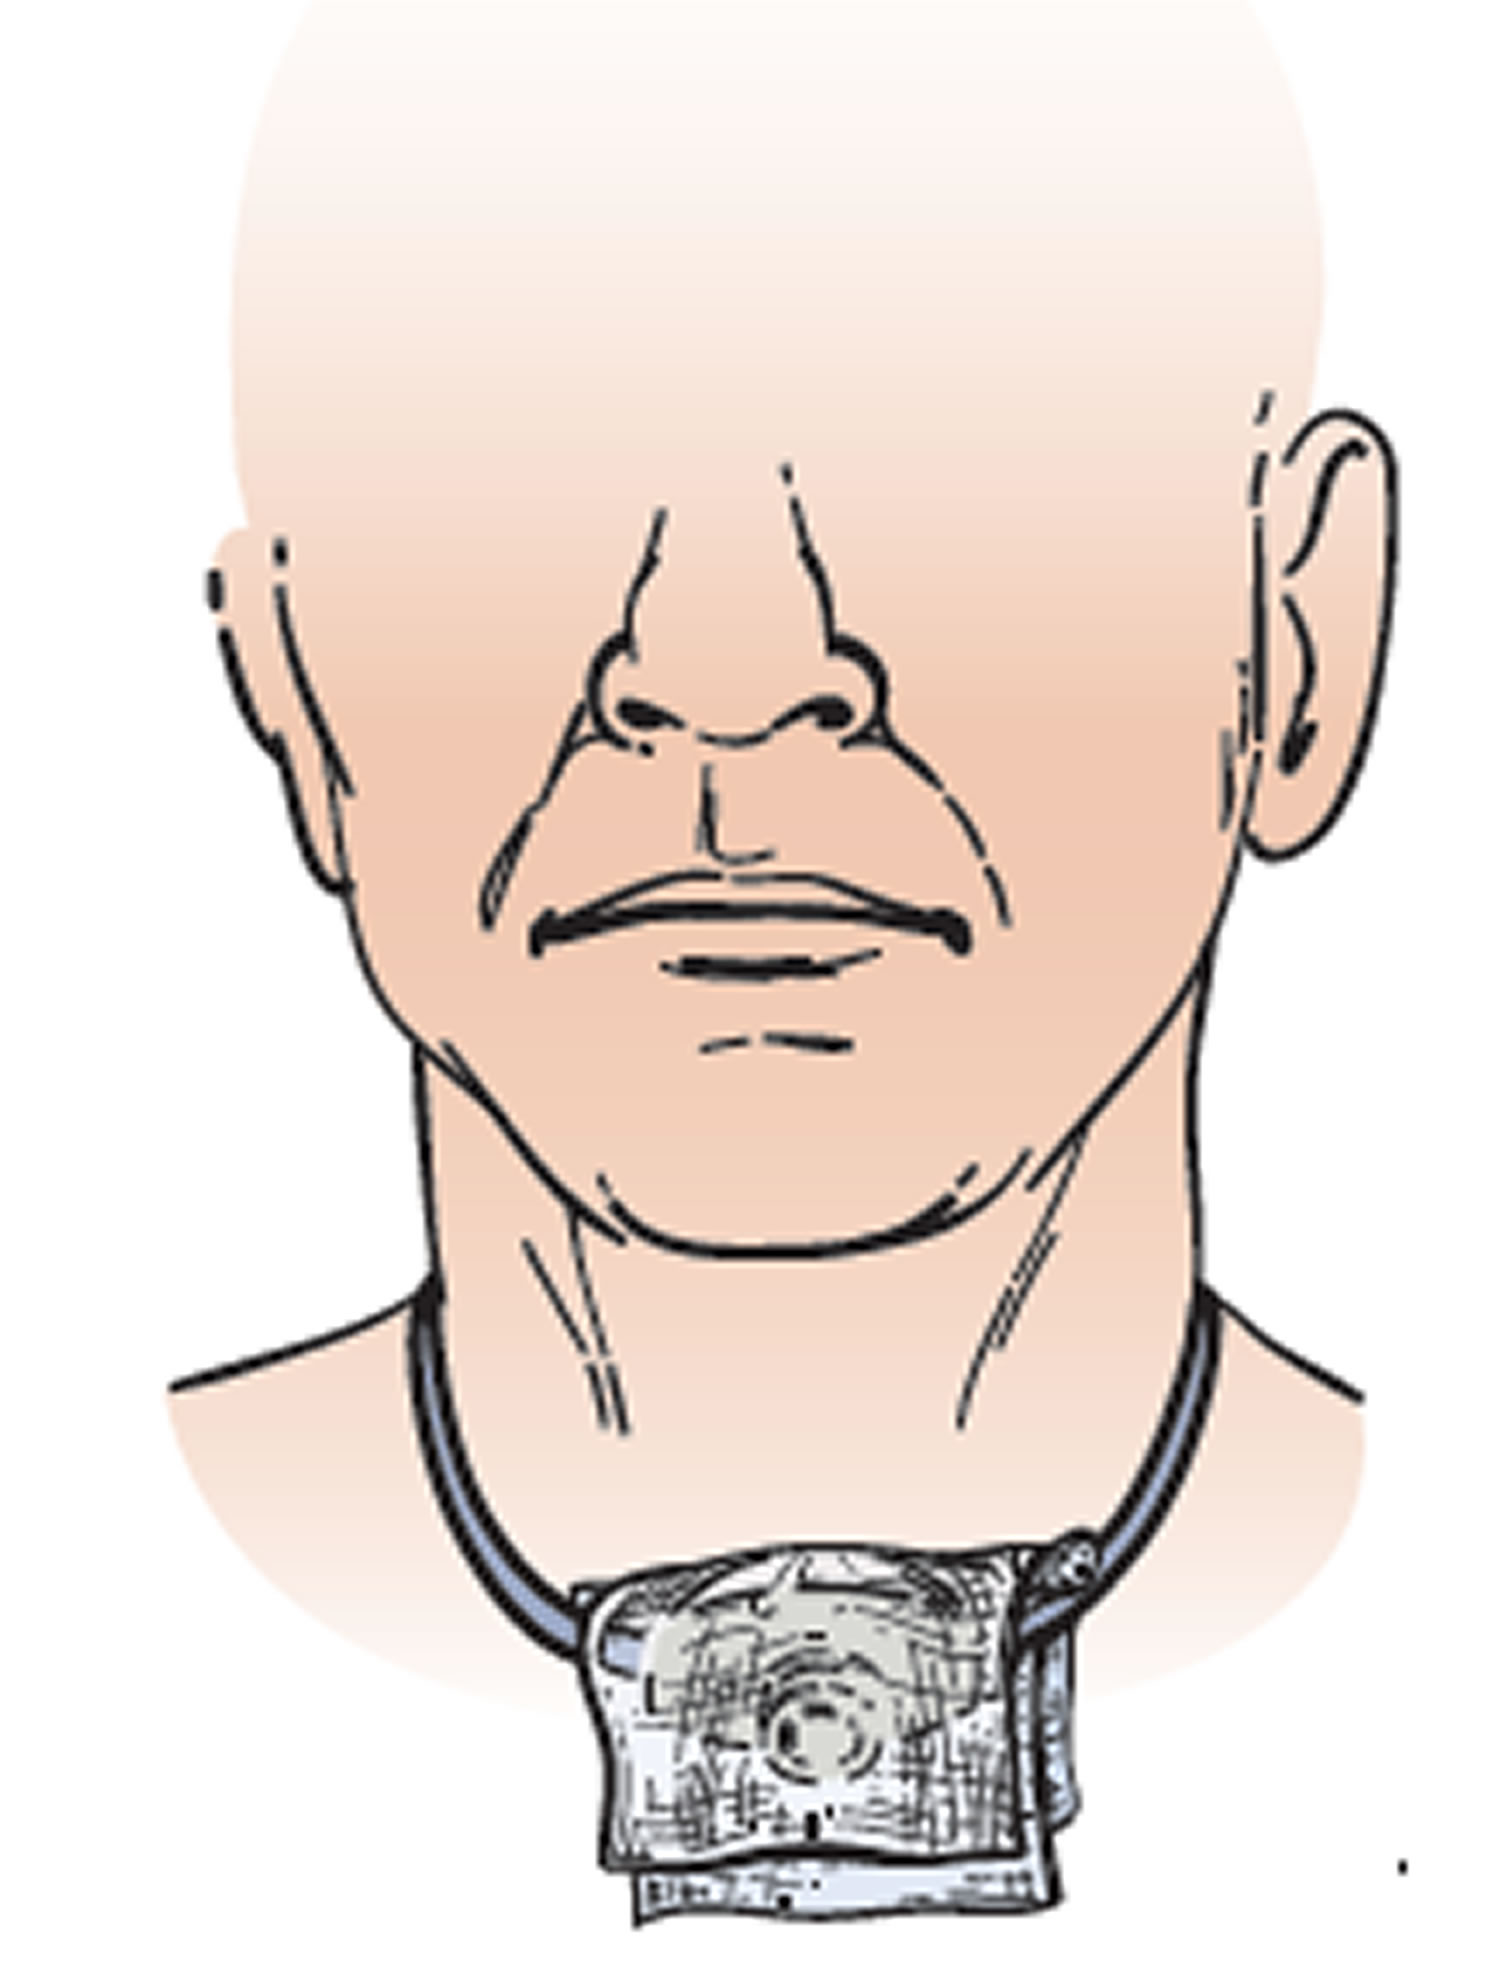
A tracheostomy is also known as a tracheotomy, is a small surgical hole (stoma) that is made through the front of the neck into the windpipe (trachea) that provides an alternative airway for breathing.
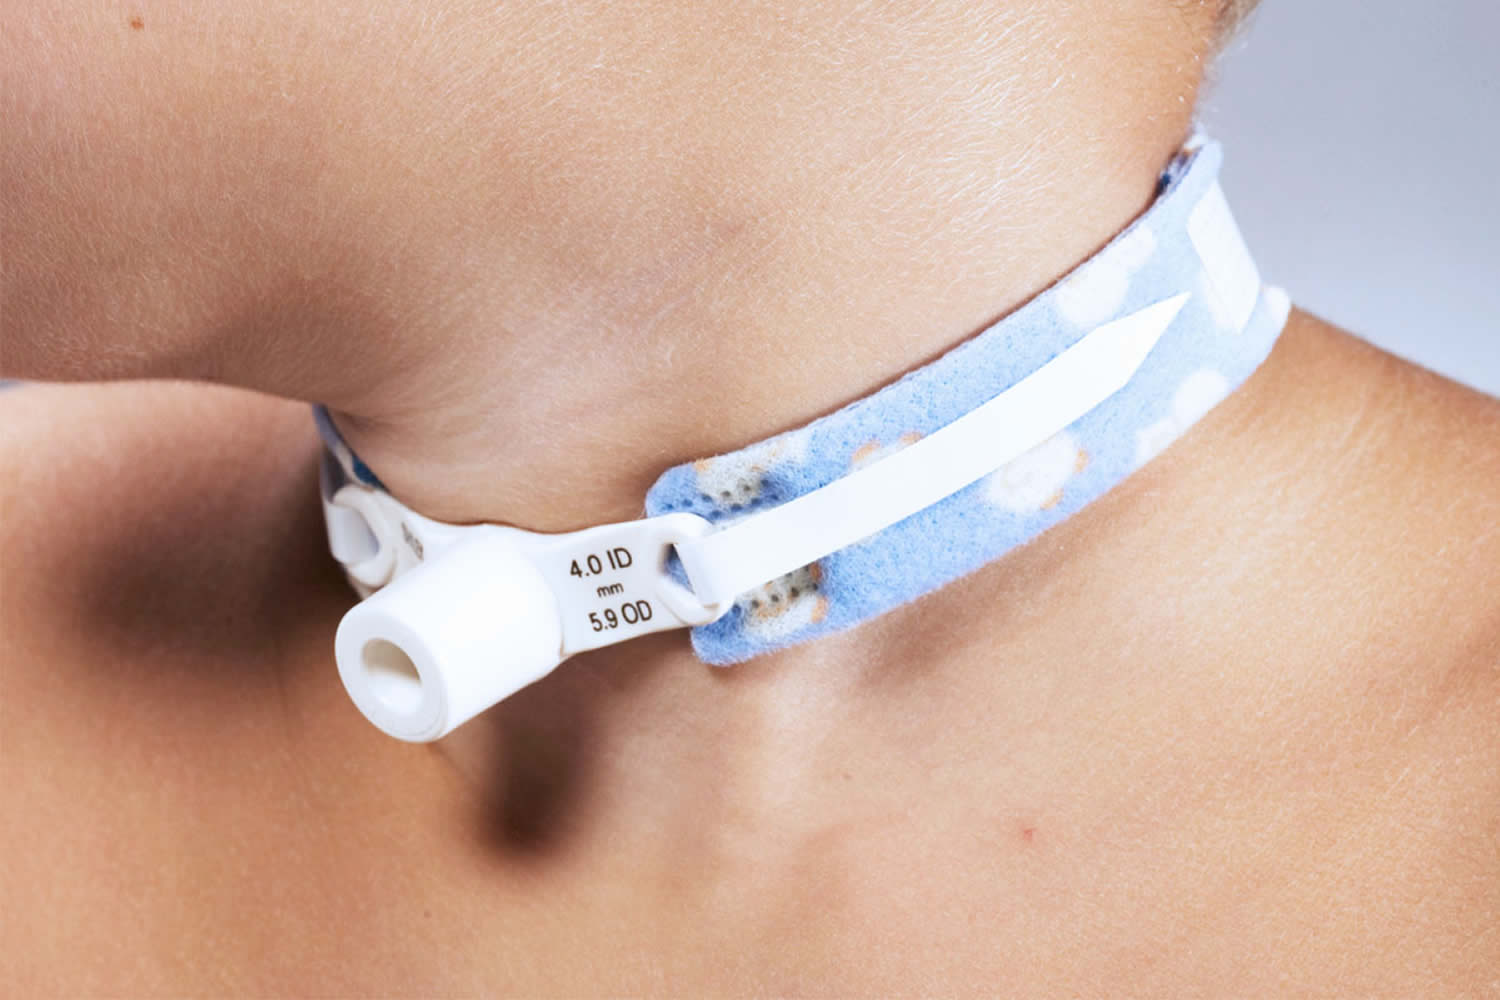
A curved plastic tube, known as a tracheostomy tube, is inserted through the hole allowing air to flow in and out of the windpipe and is secured in place with a strap around your neck. The tracheostomy tube does not extend into the lungs.
The tracheostomy tube allows the person to breathe through the throat, bypassing their upper airway, including their nose and mouth. A tracheostomy may be temporary or permanent, done as an emergency or done as a planned procedure. For example, if the tracheostomy tube is inserted to bypass a trachea that is blocked by blood or swelling, it will be removed once regular breathing is once again possible. A person with permanent damage or loss of function around the larynx or swallowing area may need a permanent tracheostomy tube to help them breathe at night.
There is a variety of tracheostomy tubes available. Tracheostomy tubes are made from either plastic or silver. All fit into the following categories: cuffed/uncuffed; fenestrated/unfenestrated; double/single cannula; minitracheostomy; and those with an adjustable flange. Each tracheostomy tube type requires specific management.
If the upper airway is obstructed, it may be necessary to make a temporary opening through the anterior wall of the trachea inferior to the larynx and insert a tracheostomy tube to allow airflow. A tracheostomy is complicated because large veins and part of the thyroid gland overlie this region.
A small incision is made in the throat and a tracheostomy tube is inserted into the windpipe (trachea). The tracheostomy tube sits in the windpipe and is tied in with tape. At first, there might be a few stitches, but these are usually taken out within a week.
Your speech will be affected and so is your eating and drinking initially.
Many people can start eating and drinking by mouth again once the tracheostomy has stabilized. This may be a week or two after the procedure. However, some people will still need to be fed by a tube.
Although tracheostomy prevents asphyxiation, the inhaled air bypasses the nasal cavity and thus is not humidified. If the opening is left for long, the mucous membranes of the respiratory tract dry out and become encrusted, interfering with the clearance of mucus from the tract and promoting infection.
When a patient is on a ventilator and air is introduced directly into the trachea, the air must be filtered and humidified by the apparatus to prevent respiratory tract damage.
It is normal for people after having a tracheostomy to feel anxious and fearful. People report having many complex feelings and physical sensations when they have a tracheostomy.
Long term outlook
Most people need 1 to 3 days to adapt to breathing through a tracheostomy tube. It will take some time to learn how to communicate with others. At first, it may be impossible for the person to talk or make sounds.
The long term outlook depends on whether the tracheostomy tube is temporary or permanent.
- If it is temporary tracheostomy, it will be removed when no longer needed and the incision allowed to heal. There may be a small scar.
- If the tracheostomy is permanent, the hole will stay open. However, the opening tends to narrow with time, and further surgery may be needed to widen the opening. The outer tube of the tracheostomy tube needs to be changed every few months, and the site should be inspected at each change. You may be referred to a speech therapist for voice training.
After training and practice, most people can learn to talk with a tracheostomy tube. People or family members learn how to take care of the tracheostomy during the hospital stay. Home-care service may also be available.
You should be able to go back to your normal lifestyle. When you are outside, you can wear a loose covering (a scarf or other protection) over the tracheostomy stoma (hole). Use safety precautions when you are exposed to water, aerosols, powder, or food particles.
Removal of the Tracheostomy Tube
Your doctor will remove your tracheostomy tube when you no longer need it. You won’t need to have surgery to do this. The opening will close on its own and you won’t need sutures (stitches).
Before the tube is removed, a closed inner cannula will be inserted in your tracheostomy tube. You will have the closed inner cannula in place for at least 24 hours. If you’re able to breathe normally with the closed inner cannula in place, your tube will be removed. You won’t feel any pain when the tube is taken out.
After the tube is removed, your doctor will put a dressing (bandage) over the tracheostomy site. Keep the dressing on the site until the opening is completely closed. This usually takes about 1 to 2 weeks.
When you cough or speak, put your finger over the tracheostomy site dressing. This will help the site to close.
Change the dressing over the tracheostomy site twice a day, or more often if it gets dirty. Each time you change the dressing, clean the skin at the site with moistened pieces of 4 x 4 gauze. Once the tracheostomy site is closed, you won’t need to wear a dressing.
What are the alternatives to a tracheostomy?
Tracheostomies are usually performed as a last resort. If there are other options suitable, your doctor will likely recommend them instead. In an emergency situation, a tracheostomy could save your life.
Figure 1. Tracheostomy
Tracheostomy tube
A tracheostomy tube has 2 pieces (see Figure 2):
- The outer cannula, which always stays in place. This keeps your tracheostomy site open. Do not remove the outer cannula. Only your doctor or nurse should remove it.
- The inner cannula, which slides in and out for cleaning. Do not leave the inner cannula out for more than a few minutes. It should always remain in place when not being cleaned.
You will also have a tracheostomy tie that goes around your neck and connects to the outer cannula. This will keep the tracheostomy tube in place.
Figure 2. Tracheostomy tube – a tracheostomy tube has 2 pieces – inner and outer cannulas
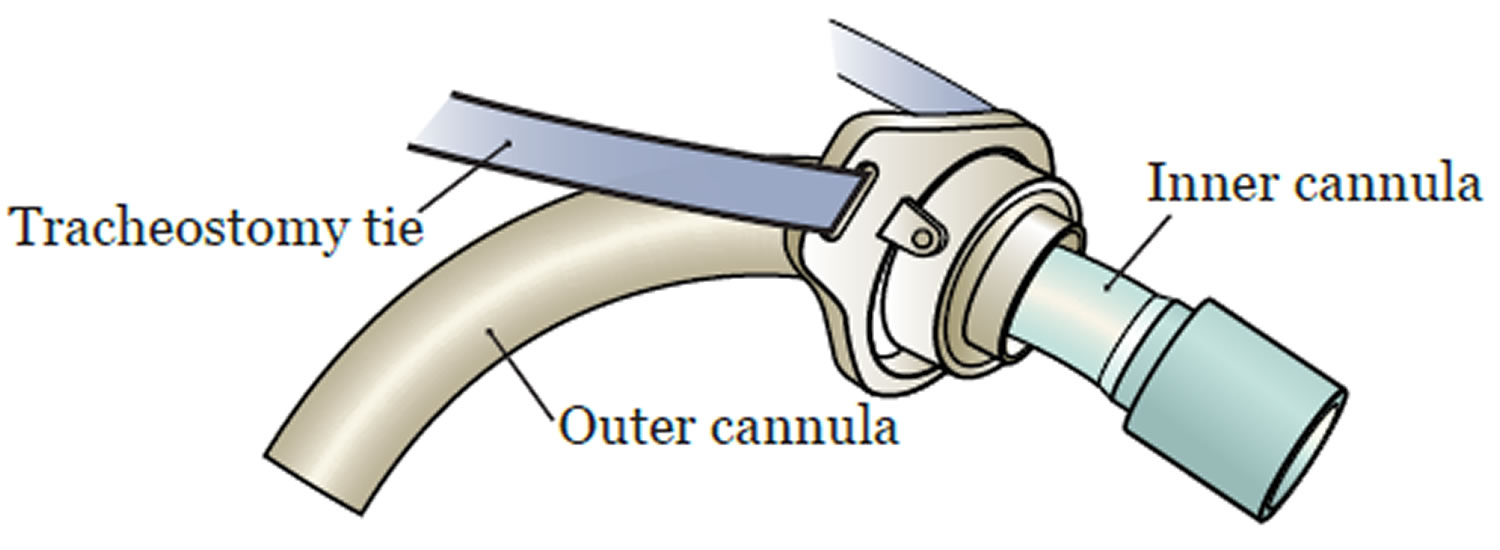
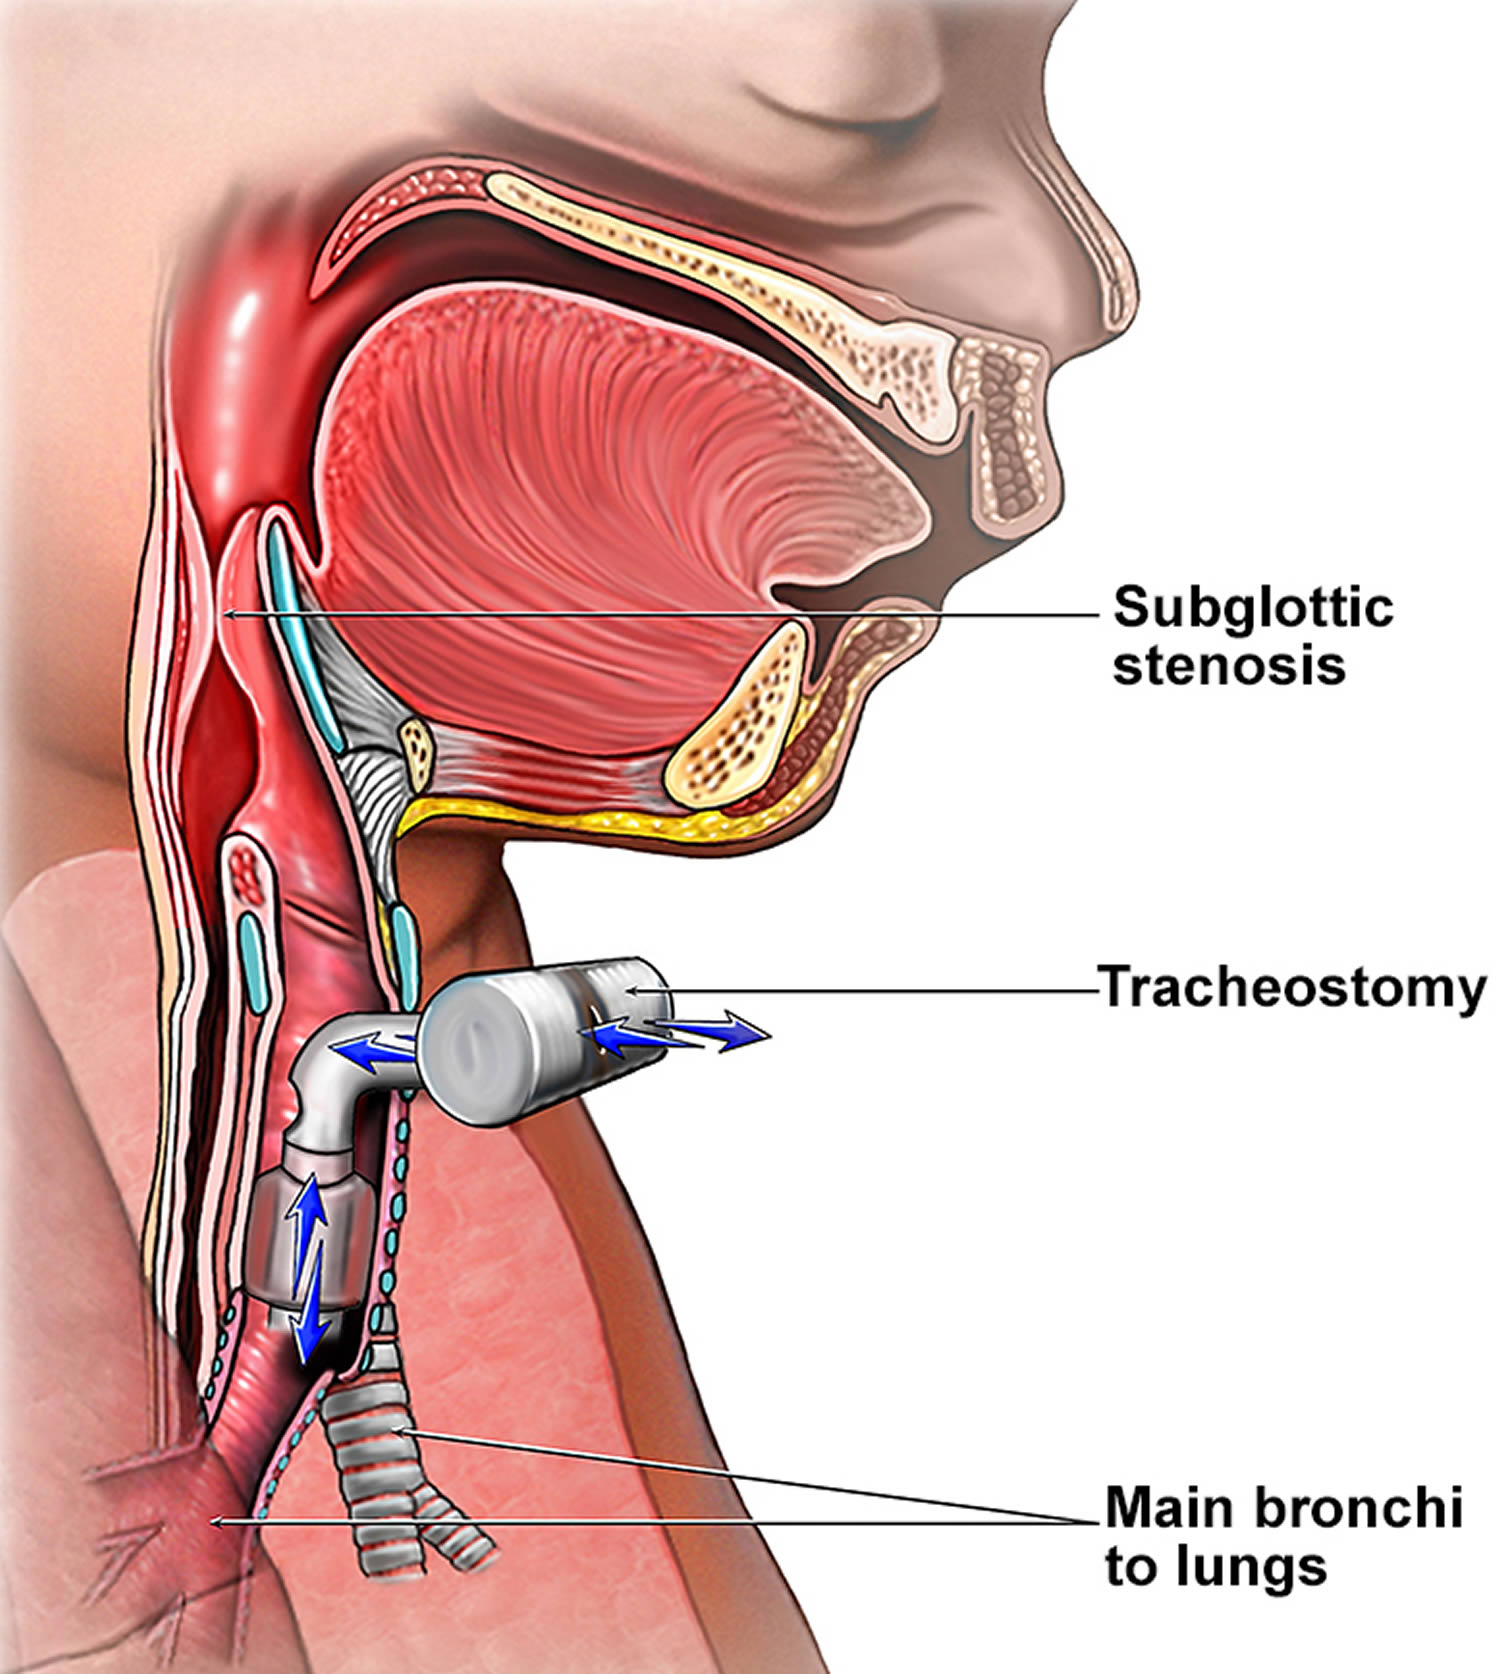
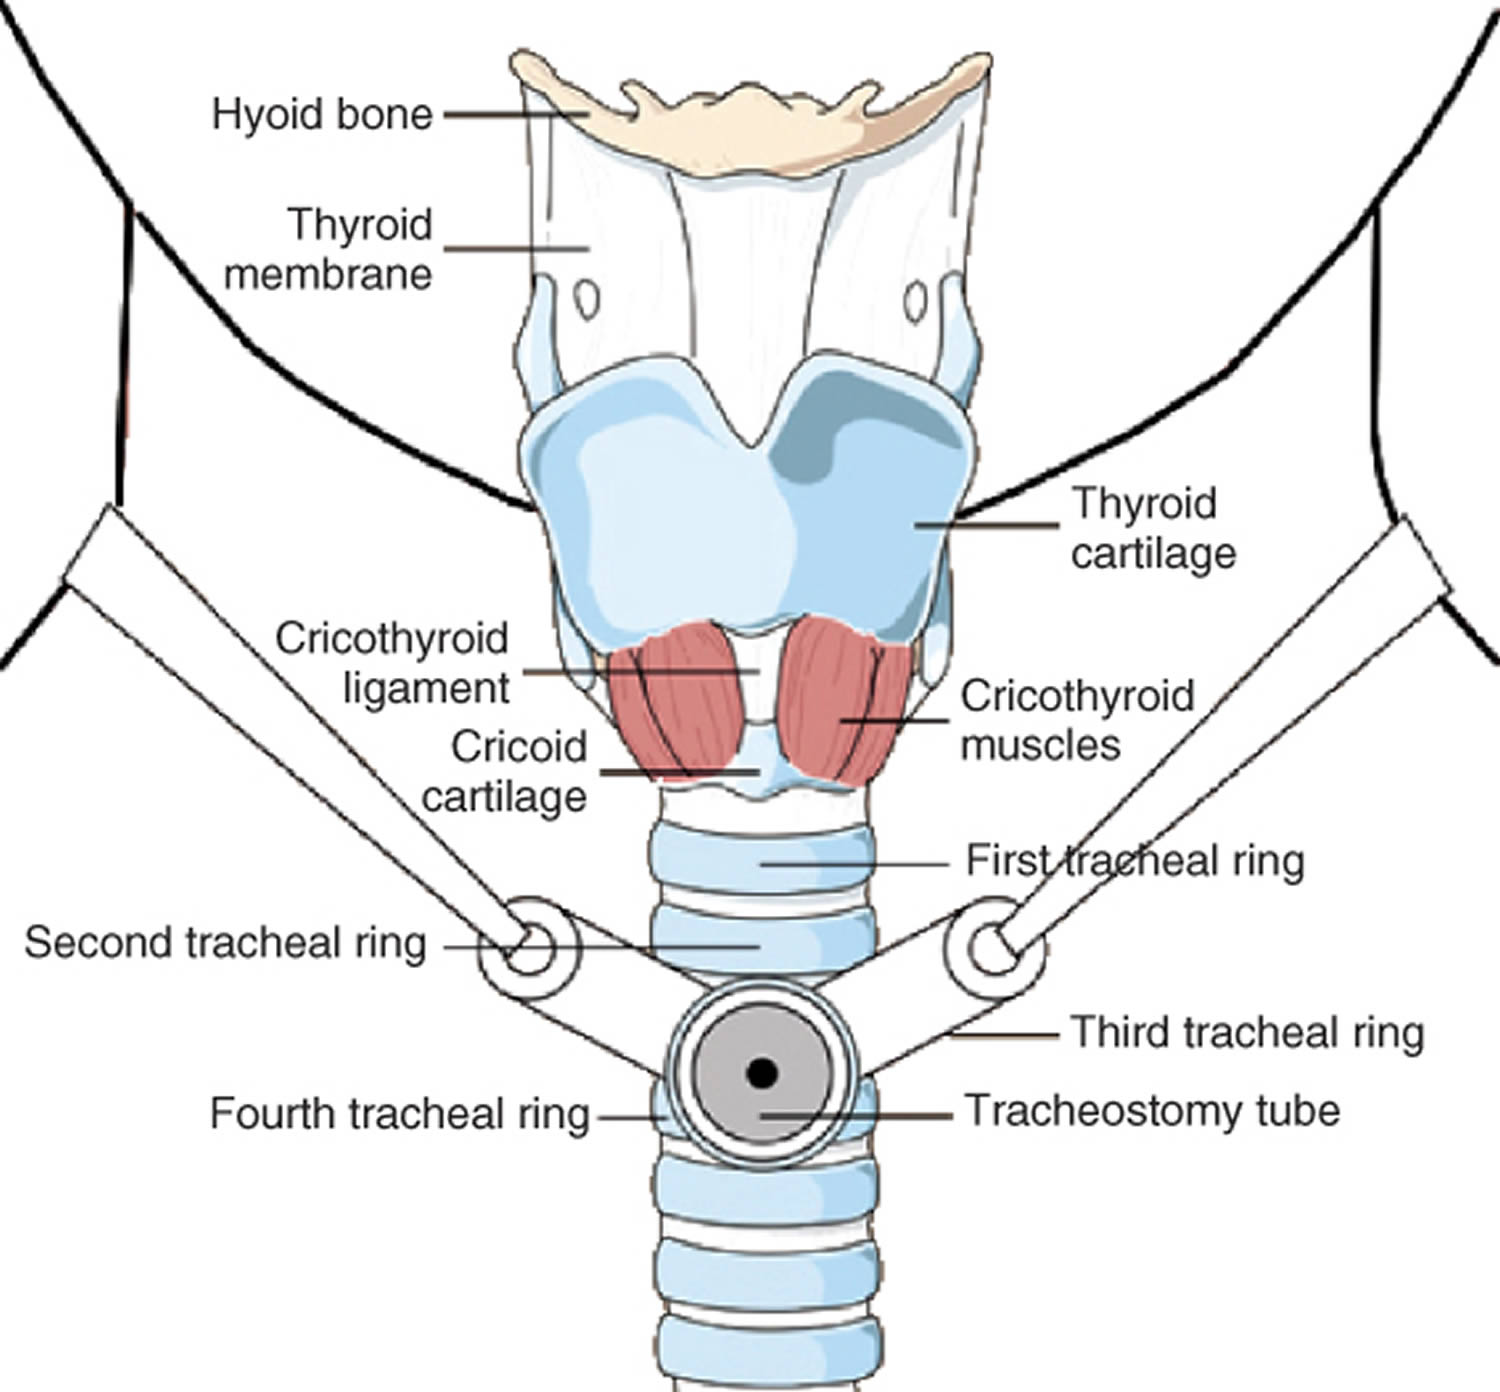
Figure 3. Trachea location
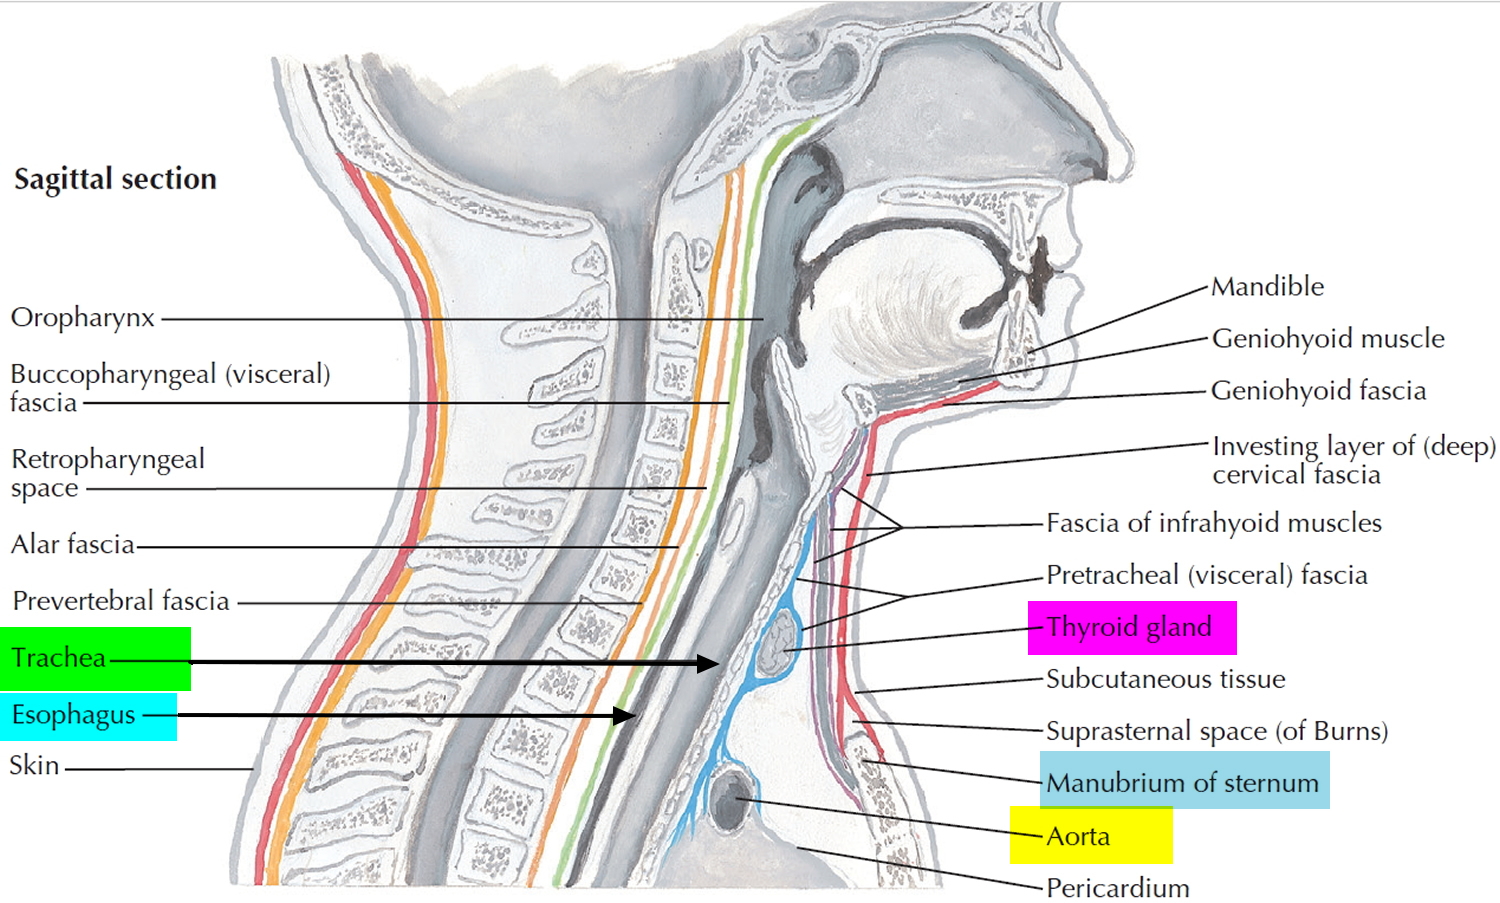
Figure 4. Trachea anatomy

Note: (a) Anterior view. (b) Longitudinal section of the trachea showing the action of the mucociliary escalator. (c) Cross section of the trachea showing the C-shaped tracheal cartilage.
Figure 5. Trachea and the cricothyroid ligament

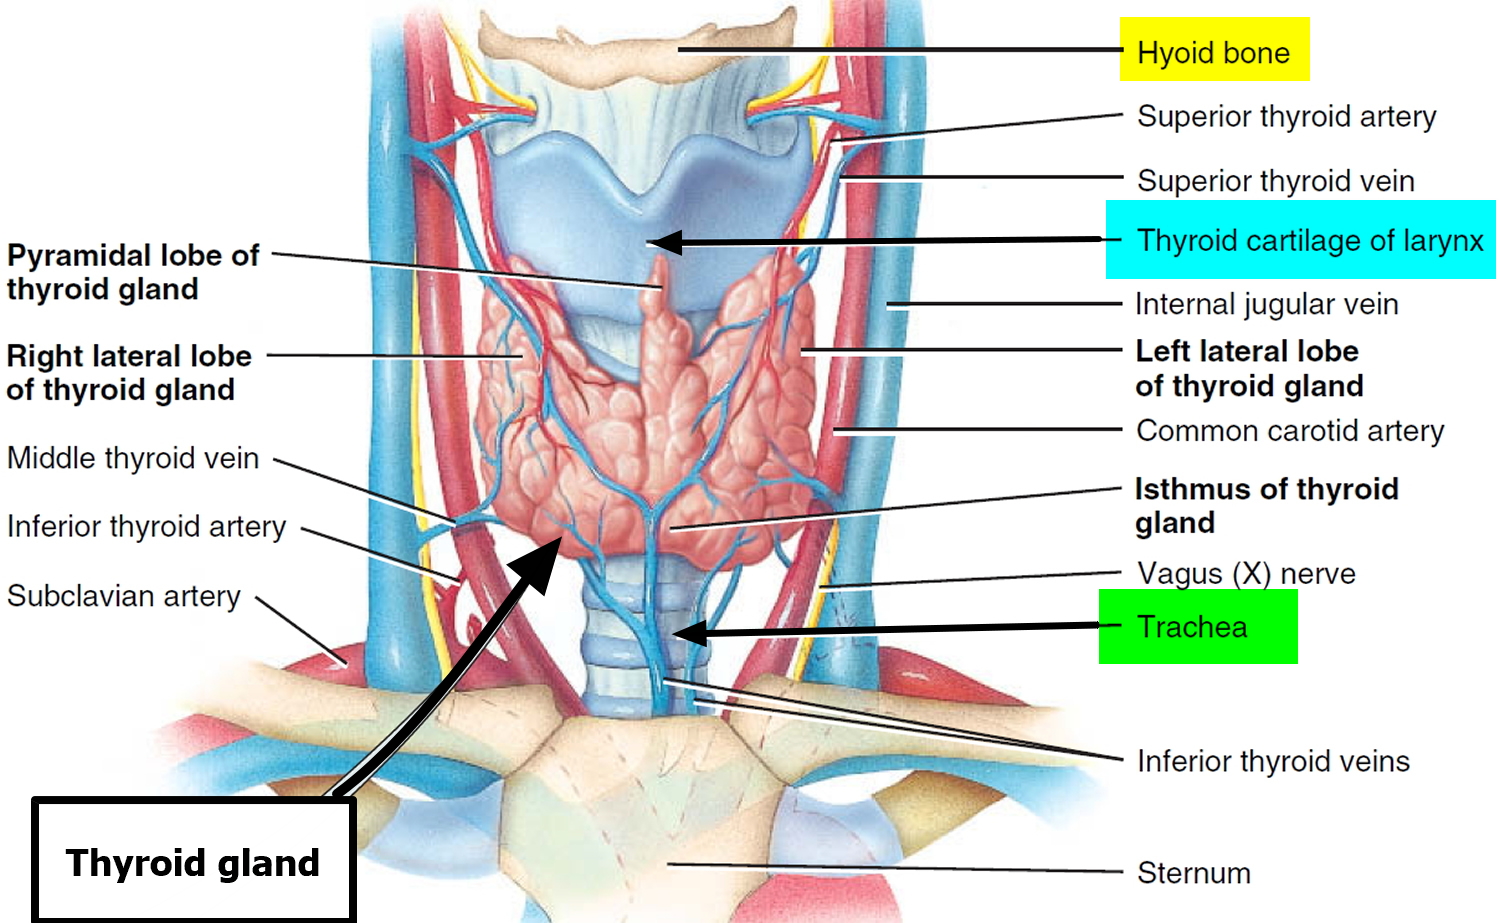
Figure 6. Trachea and the thyroid gland
Reasons for tracheostomy
A tracheostomy is performed when an adult or child has a condition that makes normal breathing difficult or impossible. Examples of patients who may have a tracheostomy are those with neuromuscular disorders who have impaired swallowing and coughing, those who have a poor cough or gag reflex after a head injury or a protracted critical illness and patients who have had their larynx removed surgically.
People have tracheostomies for many different reasons, including:
- Neurological conditions such as stroke or tumors
- Severe injuries to the head and neck
- Spinal injuries
- Paralysis, neurological problems or other conditions that make it difficult to cough up secretions from your throat and require direct suctioning of the windpipe (trachea) to clear your airway
- Burns
- Severe pneumonia
- Acquired and congenital subglottic stenosis (a condition where the windpipe is narrowed)
- Severe allergic reactions (anaphylaxis)
- Head and neck cancer, which can affect breathing by pressing on the airway
- Radiation therapy to the head and neck
- Severe lung disease
- A large object blocking the airway
- An inability to breathe on your own
- An inherited abnormality of the larynx or trachea
- Breathed in harmful material such as smoke, steam, or other toxic gases that swell and block the airway
- Paralysis of the muscles that affect swallowing
- Severe neck or mouth injuries
- Surgery around the voice box (larynx) that prevents normal breathing and swallowing
- Preparation for major head or neck surgery to assist breathing during recovery
- Medical conditions that require the use of a breathing machine (ventilator) for an extended period, usually more than one or two weeks
- Other emergency situations when breathing is obstructed and emergency personnel can’t put a breathing tube through your mouth and into your trachea
Emergency tracheostomy
Tracheostomy may be performed as an emergency procedure to provide relief of blockage of airways above the trachea. This is called an emergency tracheostomy. It involves making a cut in the thin part of the trachea just below the larynx (voice box) and inserting a tube that is connected to a supply of oxygen or air, often using a ventilator (breathing machine).
Emergency tracheotomies are difficult to perform and have an increased risk of complications. A related and somewhat less risky procedure used in emergency care is a cricothyrotomy. This procedure creates a hole directly into the voice box (larynx) at a site immediately below the Adam’s apple (thyroid cartilage).
Once a person is transferred to a hospital and stabilized, a cricothyrotomy is replaced by a tracheostomy if there’s a need for long-term breathing assistance.
Non-emergency tracheostomy
A non-emergency tracheostomy may be performed for a variety of reasons: for example, before surgery to the throat or mouth so the patient can breathe after the surgery or to make the prolonged use of ventilators more comfortable and safe.
The surgeon has no time to consult with you on medical issues in an emergency tracheostomy. In the case of a non-emergency tracheostomy, some of the medical issues to consider include:
- Medical history
- The reasons for the tracheostomy
- Surgical procedures
- Risks and complications of the surgery and tracheostomy
- After care
- Long term outlook.
Tracheostomy procedure
A tracheotomy is most commonly performed in an operating room with general anesthesia, which makes you unaware of the surgical procedure. A local anesthetic to numb the neck and throat is used if the surgeon is worried about the airway being compromised from general anesthesia or if the procedure is being done in a hospital room rather than an operating room.
A tracheostomy is usually performed under a combination of local and a light general anaesthetic.
- The surgical technique depends on whether or not the tracheostomy is being performed as a medical emergency.
- When possible and safe, the procedure is done under general anaesthesia.
The type of procedure you undergo depends on why you need a tracheostomy and whether the procedure was planned. There are essentially two options:
Emergency tracheostomy – you are positioned on your back, and a rolled-up towel (or equivalent) is placed under your shoulders to help stretch out your neck. Local anaesthetic is injected into the target area, and a skin incision (cut) is made. The surgeon will then open either the trachea (this is called a ‘tracheostomy’) or the cricothyroid membrane – the thinnest part of the airway below the larynx (this is called a ‘cricothyroidotomy’). The airway tube is inserted into the trachea and you are connected to the oxygen supply. The entire procedure is done as quickly as possible.
Non-emergency tracheostomy – the operation is usually performed under general anaesthetic in an operating room. You are positioned on your back, and your neck and chest are swabbed with antiseptic. The cut is made in the lower half of the neck, between the larynx and the sternum (breastbone). First, the skin on your throat is cut horizontally. The underlying muscles are parted, then the thyroid gland may need to be cut or pulled back to expose the trachea. A cut is made through the wall of the trachea. The tracheostomy tube is then placed into the opening. A neck strap attached to the face plate of the tube keeps it from slipping out of the hole, and temporary sutures also can be used to secure the faceplate to the skin of your neck.
Minimally invasive tracheotomy is typically performed in a hospital room. The doctor makes a small incision near the base of the front of the neck. A special lens is fed through the mouth so that the surgeon can view the inside of the throat. Using this view of the throat, the surgeon guides a needle into the windpipe to create the tracheostomy hole. The hole is then expanded to accommodate the tracheostomy tube. A neck strap attached to the faceplate of the tube keeps it from falling out of the windpipe.
What happens after a tracheostomy?
After the tracheostomy procedure, most people spend some time in the intensive care unit. This is to make sure that the wound is healing well and the tracheostomy tube can be changed safely.
A person may have a sense of panic and feel unable to breathe and speak when first waking up after the tracheostomy and placement of the tracheostomy tube. This feeling will lessen over time. Medicines may be given to help reduce the patient’s stress.
After the tracheostomy operation, you can expect the following:
- A chest x-ray may be taken to check that the tube is correctly in place and there are no complications.
- Antibiotics may be prescribed to reduce the risk of infection.
- Later, you and your carers are shown how to care for the tracheostomy tube (for example, how to clean around and in the tube).
- It takes a few days to get used to breathing through the tracheostomy tube and it will be difficult to make sounds at first. If the tube allows some air to escape and pass over the vocal cords, it may be possible to speak by holding a finger over the tube.
- Unless there are complications, you will stay in hospital for between three and five days.
Nurses, physiotherapists, dietitians and speech therapists work together to help care for people who have a tracheostomy.
After surgery, nurses may need to suction mucous out of the tube. Physiotherapists can help keep the lungs clear of mucus, and speech therapists can help with swallowing and speaking.
The tracheostomy tube needs to be changed regularly. People who go home with a tracheostomy might be given instructions on how to care for and change the tracheostomy tube. Sometimes they need to come back to hospital to have the tube changed.
If the tracheostomy is temporary, the tube will eventually be removed. Healing will occur quickly, leaving a minimal scar. Sometimes, a surgical procedure may be needed to close the site (stoma).
Occasionally a stricture, or tightening of the trachea may develop, which may affect breathing.
If the tracheostomy tube is permanent, the hole remains open.
You’ll learn skills necessary for maintaining and coping with your tracheostomy:
- Caring for your tracheostomy tube. A nurse will teach you how to clean and change your tracheostomy tube to help prevent infection. You’ll continue to do this as long as you have a tracheostomy.
- Speaking. In general, a tracheostomy prevents you from speaking because exhaled air goes out the tracheostomy opening rather than up through your voice box. However, there are devices and techniques for redirecting airflow enough to produce speech. Depending on the tube size and design, the diameter of your trachea, and the condition of your voice box, you may be able to use your voice with the tube in place. If necessary, you’ll meet with a speech therapist or a nurse trained in tracheostomy care, who can suggest options for communicating and help you learn to use your voice again. Many people can speak by covering the opening in the tube with a finger. Your speech therapist or a nurse trained in tracheostomy care will teach you how to do this.
- Eating. While you’re healing, you’ll receive nutrients through an intravenous (IV) line inserted into a vein in your body, a feeding tube that passes through your mouth or nose, or a tube inserted directly into your stomach. When you’re ready to eat again, you may need to work with a speech therapist, who can help you regain the muscle strength and coordination needed for swallowing.
- Coping with dry air. The air you breathe will be much drier since it no longer passes through your moist nose and throat before reaching your lungs. This can cause irritation, coughing and excess mucus coming out of the tracheostomy. Directly instilling small amounts of saline into the tracheostomy tube may help loosen secretions and add moisture. A saline nebulizer treatment can be delivered to a mist collar via a tube attached to a nebulizer machine. You may use a device called a heat and moisture exchanger, which captures moisture from the air you exhale and humidifies the air you inhale.
- Coping with other effects. Your health care team will show you ways to cope with the other common effects of the tracheostomy. For instance, you may also learn to use a suction machine to help you clear secretions from your throat or airway.
Tracheostomy complications
Tracheostomies are generally safe, but they do have risks.
Certain groups, including babies, smokers and the elderly, are more vulnerable to complications.
Some complications are particularly likely during or shortly after surgery. The risk of such problems greatly increases when the tracheotomy is performed as an emergency procedure.
Some of the possible risks and complications of tracheostomy include:
- Severe bleeding and damage to the throat
- Blockage of the tracheostomy tube with secretions, which can be breathed into the lungs causing pneumonia (aspiration pneumonia)
- Damage to the larynx
- Damage to the esophagus (rare)
- Air trapped in tissue under the skin of the neck (subcutaneous emphysema), which can cause breathing problems and damage to the trachea or food pipe (esophagus)
- Buildup of air between the chest wall and lungs (pneumothorax), which causes pain, breathing problems or lung collapse
- A collection of blood (hematoma) may form in the neck and compress the trachea, which causes breathing problems
- Lung collapse
- Blockage of the tracheostomy tube by blood clots, mucus or the pressure of the airway walls
- Failure of the opening to close once the tracheostomy tube is removed
- The tube may come out of the trachea (tracheostomy tube displacement) or misplacement of the tracheostomy tube
- Scar formation
- Infection
Rarer risks include:
- narrowing of the windpipe
- a hole forming between the windpipe and the food pipe
- windpipe tissue death (tracheal necrosis)
- a granuloma forms (a small area of inflamed tissue)
The risks for any anesthesia are:
- Problems breathing
- Reactions to medicines, including heart attack and stroke, or allergic reaction (rash, swelling, breathing difficulty)
Long-term complications are more likely the longer a tracheostomy is in place. These problems include:
- Displacement of the tracheostomy tube from the trachea
- Narrowing of the trachea
- Abnormal tissue formation in the trachea
- Obstruction of the tracheostomy tube
- Development of an abnormal passage between the trachea and esophagus (fistula), which can increase the risk of fluids or food entering the lungs
- Development of a passage between the trachea and the innominate artery (tracheoinnominate fistula), which can generate life-threatening bleeding
- Infection
- Bacterial colonization, which may cause illness, such as pneumonia
Tracheostomy care
If you still need a tracheostomy after you’ve left the hospital, you’ll need to keep regularly scheduled appointments for monitoring possible complications.
Be guided by your doctor, but general suggestions include:
- Use warm compresses to relieve pain at the incision site.
- Tracheostomy tubes may have an inner tube (inner cannula) that requires cleaning whenever it gets blocked with secretions – this can vary from once to several times every day.
- A humidifier attachment is needed for about one month after the surgery, as the trachea is exposed to dry air.
- It’s important to use a humidifier, especially at night. It will help to keep your secretions loose and prevent clogging.
- It is important to keep the area dry and clean – wear a scarf over the opening and when going outside. Avoid contact with water, food particles and powdery substances.
- Avoid vigorous activity in the six weeks following the surgery.
- It’s important to protect your airway at all times.
- Don’t submerge yourself in water. You can’t go swimming while your tracheostomy tube is in place, or after the tube is removed until the site is completely closed.
- When showering, avoid having water spray or splash directly into the tracheostomy.
You’ll also receive instructions about when you should call your doctor about problems, such as:
- Bleeding at the tracheostomy site or from the trachea
- Difficulty breathing through the tube
- Pain or a change in comfort level
- Redness
- Swelling
- A change in the position of your tracheostomy tube
Important Points
- If you have trouble breathing, remove the inner cannula right away. If your breathing improves, the inner cannula was most likely clogged. Clean the inner cannula well and reinsert it. If your breathing does not get better, call your local emergency services number or go to the nearest emergency room immediately.
- If the entire tracheostomy tube is removed by accident, do not panic. The tract will stay open for hours to days. Call local emergency services number or go to the nearest emergency room immediately to have it put back in.
Caring for your tracheostomy
Your nurse will teach you how to care for your tracheostomy while you’re in the hospital. If you leave the hospital with the tracheostomy in place, you will continue to care for it at home. You will learn how to:
- Suction the tracheostomy tube
- Clean the suction catheter
- Clean the inner cannula
- Clean your skin around the tracheostomy site
- Moisturize the air you breathe
Suctioning the tracheostomy tube
Suctioning the tracheostomy tube will keep your airway free of secretions (mucus) and allow you to breathe without difficulty. Your nurse will teach you how and tell you how often to do this.
Instructions
- Gather your equipment.
- 1 suction machine with plastic tubing
- 1 suction catheter
- 1 bowl or large cup filled with water
- 1 mirror
- 2 to 4 dry gauze pads
- Wash your hands thoroughly with soap and water or use an alcohol-based hand sanitizer.
- Open the package with the suction catheter. Connect the catheter to the plastic tubing of the suction machine.
- Position the mirror so you can see the opening of your tracheostomy tube.
- Turn on the suction machine. (If you’re in the hospital, you must open the clamp on the suction tubing instead).
- Pinch the suction catheter between your thumb and forefinger to block the suction.
- Cough deeply to bring up any secretions.
- Keep the suction catheter pinched. Insert it about 3 to 5 inches (8 to 13 centimeters) into your tracheostomy tube.
- Un-pinch the suction catheter to begin suctioning. Do not keep the suction catheter in your trachea for longer than 10 seconds, or you may have shortness of breath.
- Using a rotating motion, slowly pull the suction catheter out of your tracheostomy. Rotating the catheter allows secretions on all sides of your trachea and the tube to be suctioned.
- Wipe off the secretions from the suction catheter with dry gauze.
- Rinse the secretions from the suction catheter by suctioning the water through it.
- Repeat the steps above if you feel that you have more secretions that need to be cleared out.
- If you need to repeat the suctioning more than 2 or 3 times, rest for a few minutes before doing it again.
Cleaning the suction catheter
Each time you finish suctioning your tracheostomy tube, you must clean the suction catheter.
Instructions while you’re in the hospital
Gather your equipment:
1 jar of Dakin’s® solution or another antiseptic
1 bowl or large cup filled with water
Rinse the suction catheter with water and then suction more water through it.
Close the clamp.
Put the suction catheter into a jar of Dakin’s solution or another antiseptic fluid.
While you’re in the hospital, a patient care technician will give you a new suction catheter each day.
Instructions when you’re at home
- Gather your equipment:
- 1 clean, dry cloth or paper towel
- 1 bowl or large cup filled with water
- Rinse the suction catheter with water and then suction more water through it.
- Dry the suction catheter with the dry cloth or paper towel.
- Disconnect the suction catheter from the plastic tubing on the suction machine.
- Place the suction catheter on the dry cloth or paper towel.
While you’re at home, change the suction catheter once a week, or more often if it becomes dirty or clogged.
Empty the secretions from the inside of the suction machine into the toilet. Don’t empty them into the sink or the drain could become clogged.
Clean the canister of the suction machine as needed with soap and water.
Cleaning the inner cannula and your skin around the tracheostomy site
Clean the inner cannula every 2 to 4 hours, or more often as needed, to keep it free of secretions. This will make it easier for you to breathe.
Don’t start changing the tracheostomy tube ties that hold the tracheostomy tube in place until your doctor tells you it’s safe to do so.
Instructions
- Gather your equipment:
- 4 to 6 cotton swabs, or as many as needed
- A mirror
- A nylon brush
- Wash your hands thoroughly with soap and water or use an alcohol-based hand sanitizer.
- Stand or sit in front of a sink with a mirror.
- With the fingers of one hand, hold the outer cannula in place. With the fingers of your other hand, unlock the inner cannula by twisting it, then slide it out (see Figure 7). Do not keep the inner cannula out for more than a few minutes.
- Hold the inner cannula under warm running water. Clean it with the nylon brush (see Figure 8). Once the cannula is clean, shake out the excess water.
- Slide the inner cannula back into the outer cannula right after you clean it. This will prevent the outer cannula from becoming blocked with secretions.
- Gently clean the skin around your tracheostomy tube with moistened cotton swabs.
If you will have a tracheostomy for an extended period of time, your doctor or nurse will change the entire tracheostomy tube during office visits. This includes the inner and outer cannulas and the tracheostomy tube ties that keep your tracheostomy tube in place. Do not do this on your own since you may not be able to reinsert it into your trachea.
Figure 7. Unlocking the inner cannula
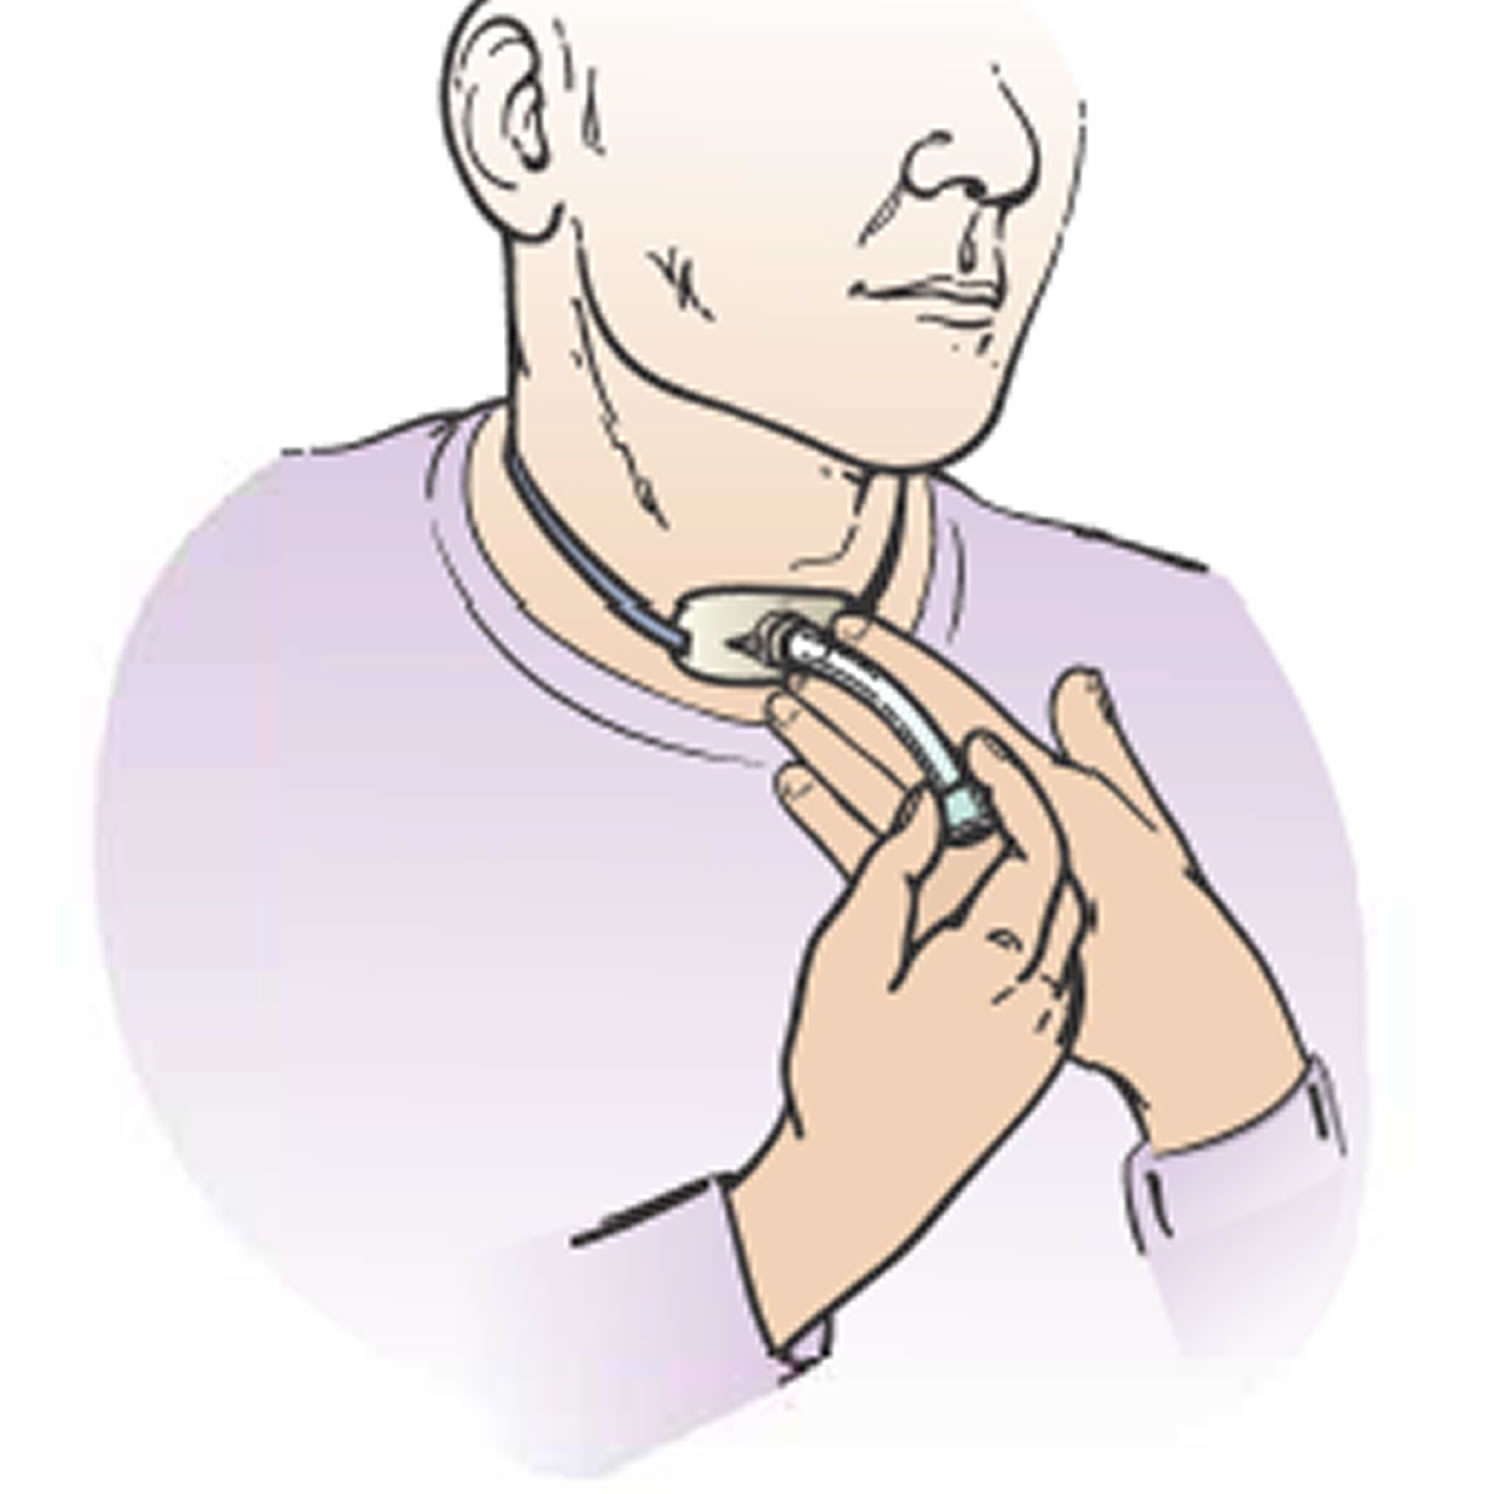 Figure 8. Cleaning the inner cannula
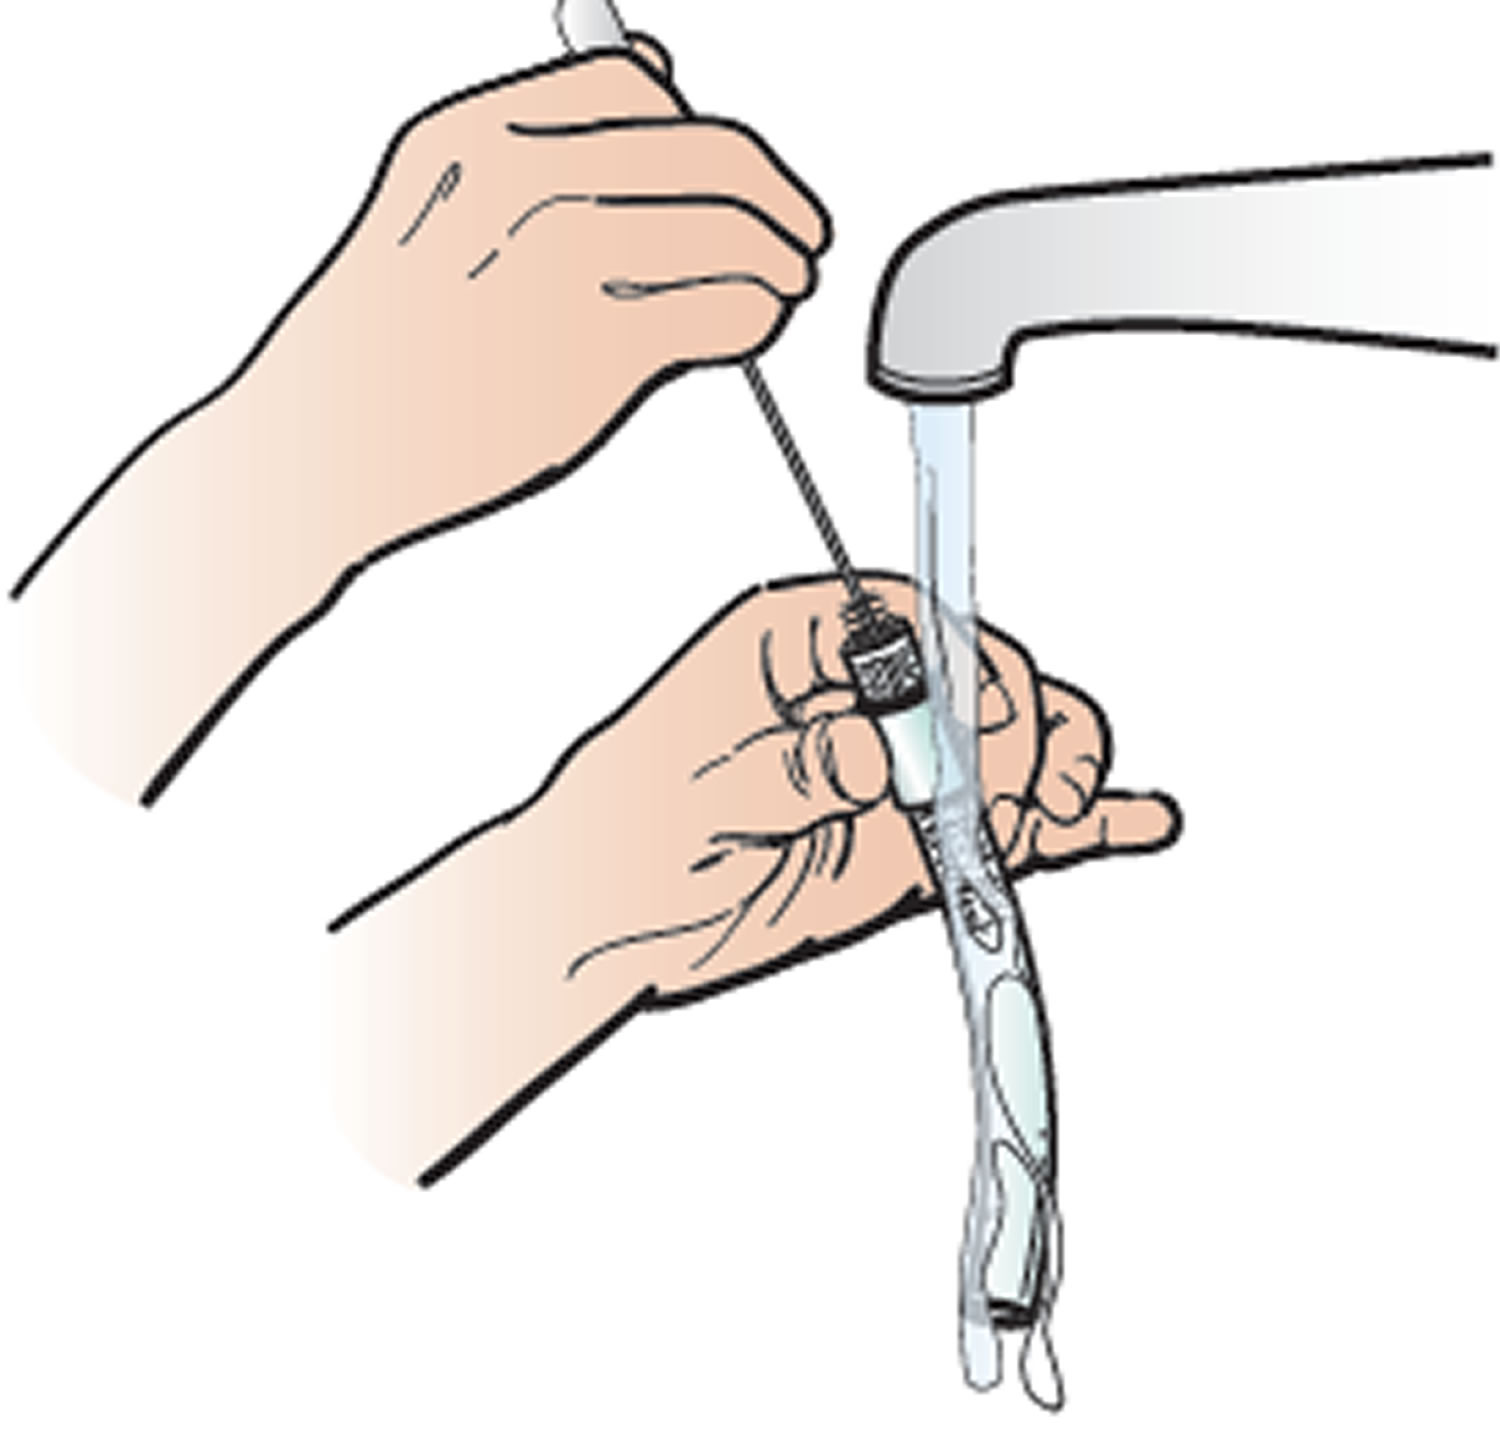
Moisturizing the air you breathe
Placing a moist piece of gauze in front of your tracheostomy tube will help filter, moisturize, and warm the air you breathe in. Try to do this as often as possible. This will keep your secretions fluid and will make it easier to suction them and clean your trachea.
Instructions
- Gather your equipment.
- One 4 inch x 4 inch piece of gauze
- Neck string
- Scissors
- Wash your hands thoroughly with soap and water or use an alcohol-based hand sanitizer.
- Stand or sit in front of a sink with a mirror.
- Moisten the 4 x 4 piece of gauze with water. Cut a piece of neck string that’s long enough to fit comfortably around your neck.
- Open the gauze and drape it over the neck string. Put the gauze in front of the tracheostomy tube opening (see Figure 9). Tie the neck string in a bow at the back of your neck to keep it in place.
- Keep the gauze in place until it becomes dry. Once the gauze is dry, throw it away. Repeat the steps above to replace it.
Figure 9. Moistened gauze placed over the tracheostomy tube opening

